

Managing microfrontends
With a project's Microfrontends settings of the Vercel dashboard, you can:
- Add and remove microfrontends
- Share settings between microfrontends
- Route Observability data
- Manage security with Deployment Protection and Firewall
You can also use the Vercel Toolbar to manage microfrontends.
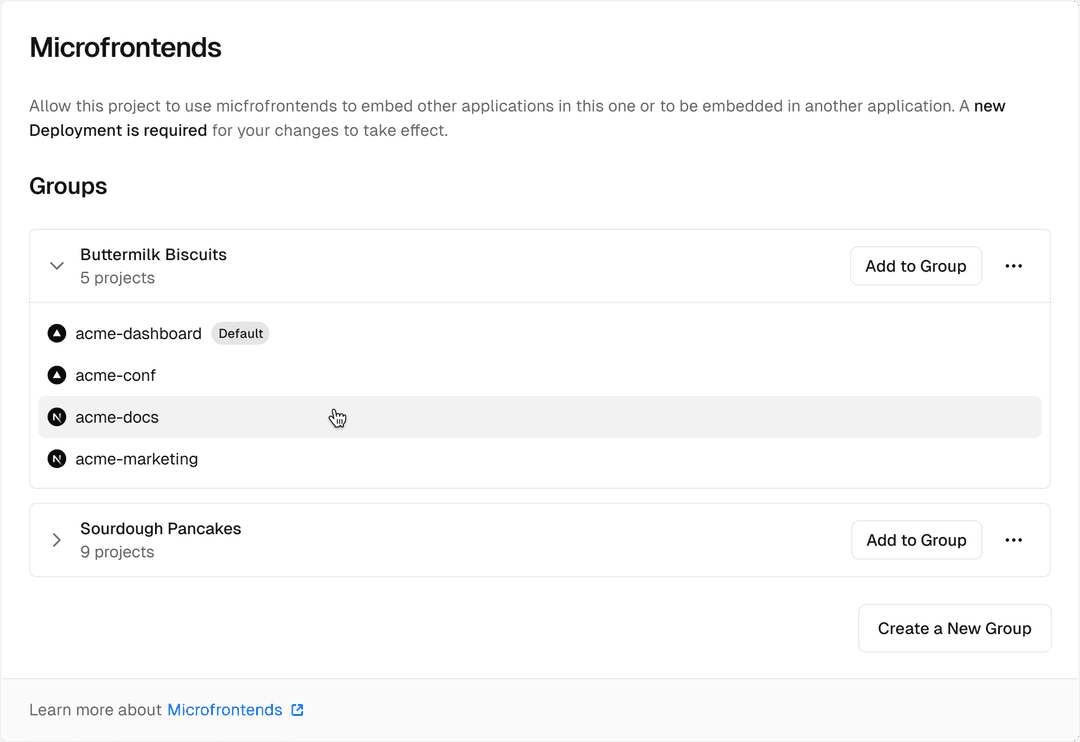
To add projects to a microfrontends group:
- Visit the Settings tab for the project that you would like to add or remove.
- Click on the Microfrontends tab.
- Find the microfrontends group that it is being added to and Click Add to Group.
These changes will take effect on the next deployment.
To remove projects from a microfrontends group:
- Remove the microfrontend from the
microfrontends.jsonin the default application. - Visit the Settings tab for the project that you would like to add or remove.
- Click on the Microfrontends tab.
- Find the microfrontends group that the project is a part of. Click Remove from Group to remove it from the group.
Make sure that no other microfrontend is referring to this project. These changes will take effect on the next deployment.
Projects that are the default application for the microfrontends group can only be removed after all other projects in the group have been removed. A microfrontends group can be deleted once all projects have been removed.
This setting only applies to preview and custom environments. Requests for the production environment are always routed to the production deployment for each microfrontend project.
When microfrontend projects are not built for a commit in preview or custom environments, Vercel will route those requests to a specified fallback so that requests in the entire microfrontends group will continue to work. This allows developers to build and test a single microfrontend without having to build other microfrontends.
There are three options for the fallback environment setting:
Same Environment- Requests to microfrontends not built for that commit will fall back to a deployment for the other microfrontend project in the same environment.- For example, in the
Previewenvironment, requests to a microfrontend that was not built for that commit would fallback to thePreviewenvironment of that other microfrontend. If in a custom environment, the request would instead fallback to the custom environment with the same name in the other microfrontend project. - When this setting is used, Vercel will generate
Previewdeployments on the production branch for each microfrontend project automatically.
- For example, in the
Production- Requests to microfrontends not built for this commit will fall back to the promoted Production deployment for that other microfrontend project.- A specific custom environment - Requests to microfrontends not built for this commit will fall back to a deployment in a custom environment with the specified name.
This table illustrates the different fallback scenarios that could arise:
| Current Environment | Fallback Environment | If Microfrontend Built for Commit | If Microfrontend Did Not Build for Commit |
|---|---|---|---|
Preview | Same Environment | Preview | Preview |
Preview | Production | Preview | Production |
Preview | staging Custom Environment | Preview | staging Custom Environment |
staging Custom Environment | Same Environment | staging Custom Environment | staging Custom Environment |
staging Custom Environment | Production | staging Custom Environment | Production |
staging Custom Environment | staging Custom Environment | staging Custom Environment | staging Custom Environment |
If the current environment is Production, requests will always be routed to the Production environment of the other project.
If using the Same Environment or Custom Environment options, you may need
to make sure that those environments have a deployment to fall back to. For
example, if using the Custom Environment option, each project in the
microfrontends group will need to have a Custom Environment with the specified
name. If environments are not configured correctly, you may see a
MICROFRONTENDS_MISSING_FALLBACK_ERROR
on the request.
To configure this setting, visit the Settings tab for the microfrontends group and configure the Fallback Environment setting.
If your project has a project domain assigned to a Git branch, and the fallback environment is set to Same Environment, deployments on that branch will use the branch's project domain as the fallback environment instead of the production branch (e.g. main).
To use that branch across the microfrontends group, add a project domain for the branch to every project in the group.
To share settings between Vercel microfrontend projects, you can use the Vercel Terraform Provider to synchronize across projects.
Shared Environment Variables allow you to manage a single secret and share it across multiple projects seamlessly.
To use environment variables with the same name but different values for different project groups, you can create a shared environment variable with a unique identifier (e.g., FLAG_SECRET_X). Then, map it to the desired variable (e.g., FLAG_SECRET=$FLAG_SECRET_X) in your .env file or build command.
Navigations between different top level microfrontends will introduce a hard navigation for users. Vercel optimizes these navigations by automatically prefetching and prerendering these links to minimize any user-visible latency.
To get started, add the PrefetchCrossZoneLinks element to your layout.tsx or layout.jsx file in all your microfrontend applications:
import {
  PrefetchCrossZoneLinks,
  PrefetchCrossZoneLinksProvider,
} from '@vercel/microfrontends/next/client';

export default function RootLayout({
  children,
}: {
  children: React.ReactNode;
}) {
  return (
    <html lang="en">
      <body>
        <PrefetchCrossZoneLinksProvider>
          {children}
        </PrefetchCrossZoneLinksProvider>
        <PrefetchCrossZoneLinks />
      </body>
    </html>
  );
}
Then in all microfrontends, use the Link component from @vercel/microfrontends/next/client anywhere you would use a normal link to automatically use the prefetching and prerendering optimizations.
import { Link } from '@vercel/microfrontends/next/client';

export function MyComponent() {
  return (
    <>
      <Link href="/docs">Docs</Link>
    </>
  );
}
When using this feature, all paths from the microfrontends.json file will be
visible on the client side. This information is used to know which
microfrontend each link comes from in order to apply prefetching and
prerendering.
By default, observability data from Speed Insights and Analytics is routed to the default application. You can view this data in the Speed Insights and Analytics tabs of the Vercel project for the microfrontends group's default application.
Microfrontends also provides an option to route a project's own observability data directly to that Vercel project's page.
- Ensure your Speed Insights and Analytics package dependencies are up to date. For this feature to work:
@vercel/speed-insights(if using) must be at version1.2.0or newer@vercel/analytics(if using) must be at version1.5.0or newer
- Visit the Settings tab for the project that you would like to change data routing.
- Click on the Microfrontends tab.
- Search for the Observability Routing setting.
- Enable the setting to route the project's data to the project. Disable the setting to route the project's data to the default application.
- The setting will go into effect for the project's next production deployment.
Enabling or disabling this feature will not move existing data between the default application and the individual project. Historical data will remain in place.
If you are using Turborepo with --env-mode=strict, you need to either add ROUTE_OBSERVABILITY_TO_THIS_PROJECT and NEXT_PUBLIC_VERCEL_OBSERVABILITY_BASEPATH to the allowed env variables or set --env-mode to loose. See documentation for more information.
Was this helpful?