Feature experimentation allows businesses to measure the real-world impact of new features through user performance metrics. When implemented effectively, it enables teams to:
- Verify business impact by measuring user engagement.
- Foster innovation through controlled testing of new ideas.
- Release features quickly and safely, with the ability to roll back.
However, to ensure a positive user experience and business outcomes, it's important to avoid common pitfalls:
- Performance issues: Bloated JavaScript bundles or blocking API calls can significantly slow page loading, delaying visual feedback to users.
- Poor user experience: Layout shift, flickering of content, or unintentionally revealing experiments can negatively impact the user experience.
- Harmed developer experience: Coupling feature releases with deployments or complicating the testing process can slow down development iteration.
This guide shows you how to implement feature experimentation while avoiding these pitfalls.
You will integrate Optimizely Feature Experimentation with Next.js and Vercel to control the behavior of a "Buy Now" button on a product detail page. You will start with a prebuilt Next.js template and use feature experimentation to release it and control its behavior. This solution uses:
- Next.js App Router: Uses React Server Components (RSC), streaming, and middleware. These features enable feature experimentation without sacrificing performance or user experience.
- Flags SDK: Allows you to define feature flags in code, making it easy to control feature visibility and behavior.
- @vercel/toolbar: Provides a convenient interface for overriding and testing feature flags in development and production.
This guide involves writing TypeScript and React code with Next.js. Familiarity with these frameworks will be helpful as you proceed.
You will need the following accounts:
- An Optimizely Feature Experimentation account to create and test experiments.
- A GitHub account to store the code written.
- A Vercel account to deploy the application.
Gather the necessary Optimizely project information to connect your feature flags. This information includes your Optimizely project ID, Personal Access Token, and Production SDK key.
- Log in to app.optimizely.com and access your Feature Experimentation project.
- Note the project ID in the URL between "projects" and "flags". For example,
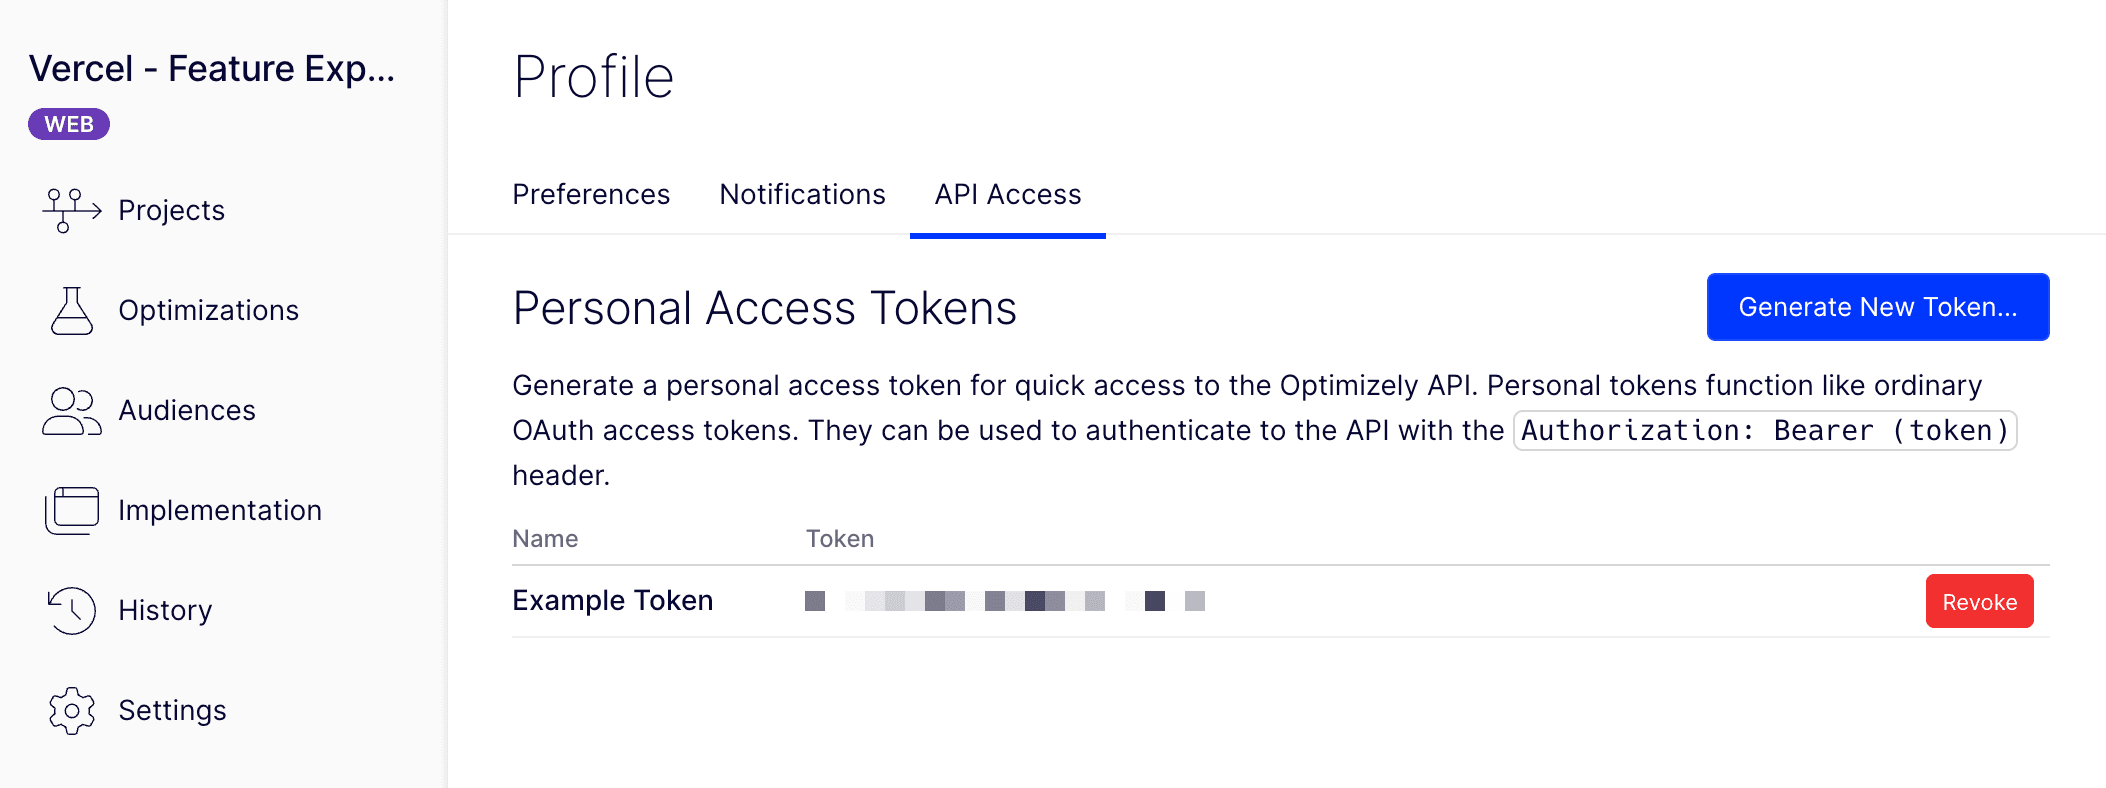
app.optimizely.com/v2/projects/[project ID]/flags/list. - Access your profile settings and create a new Personal Access Token under API Access.
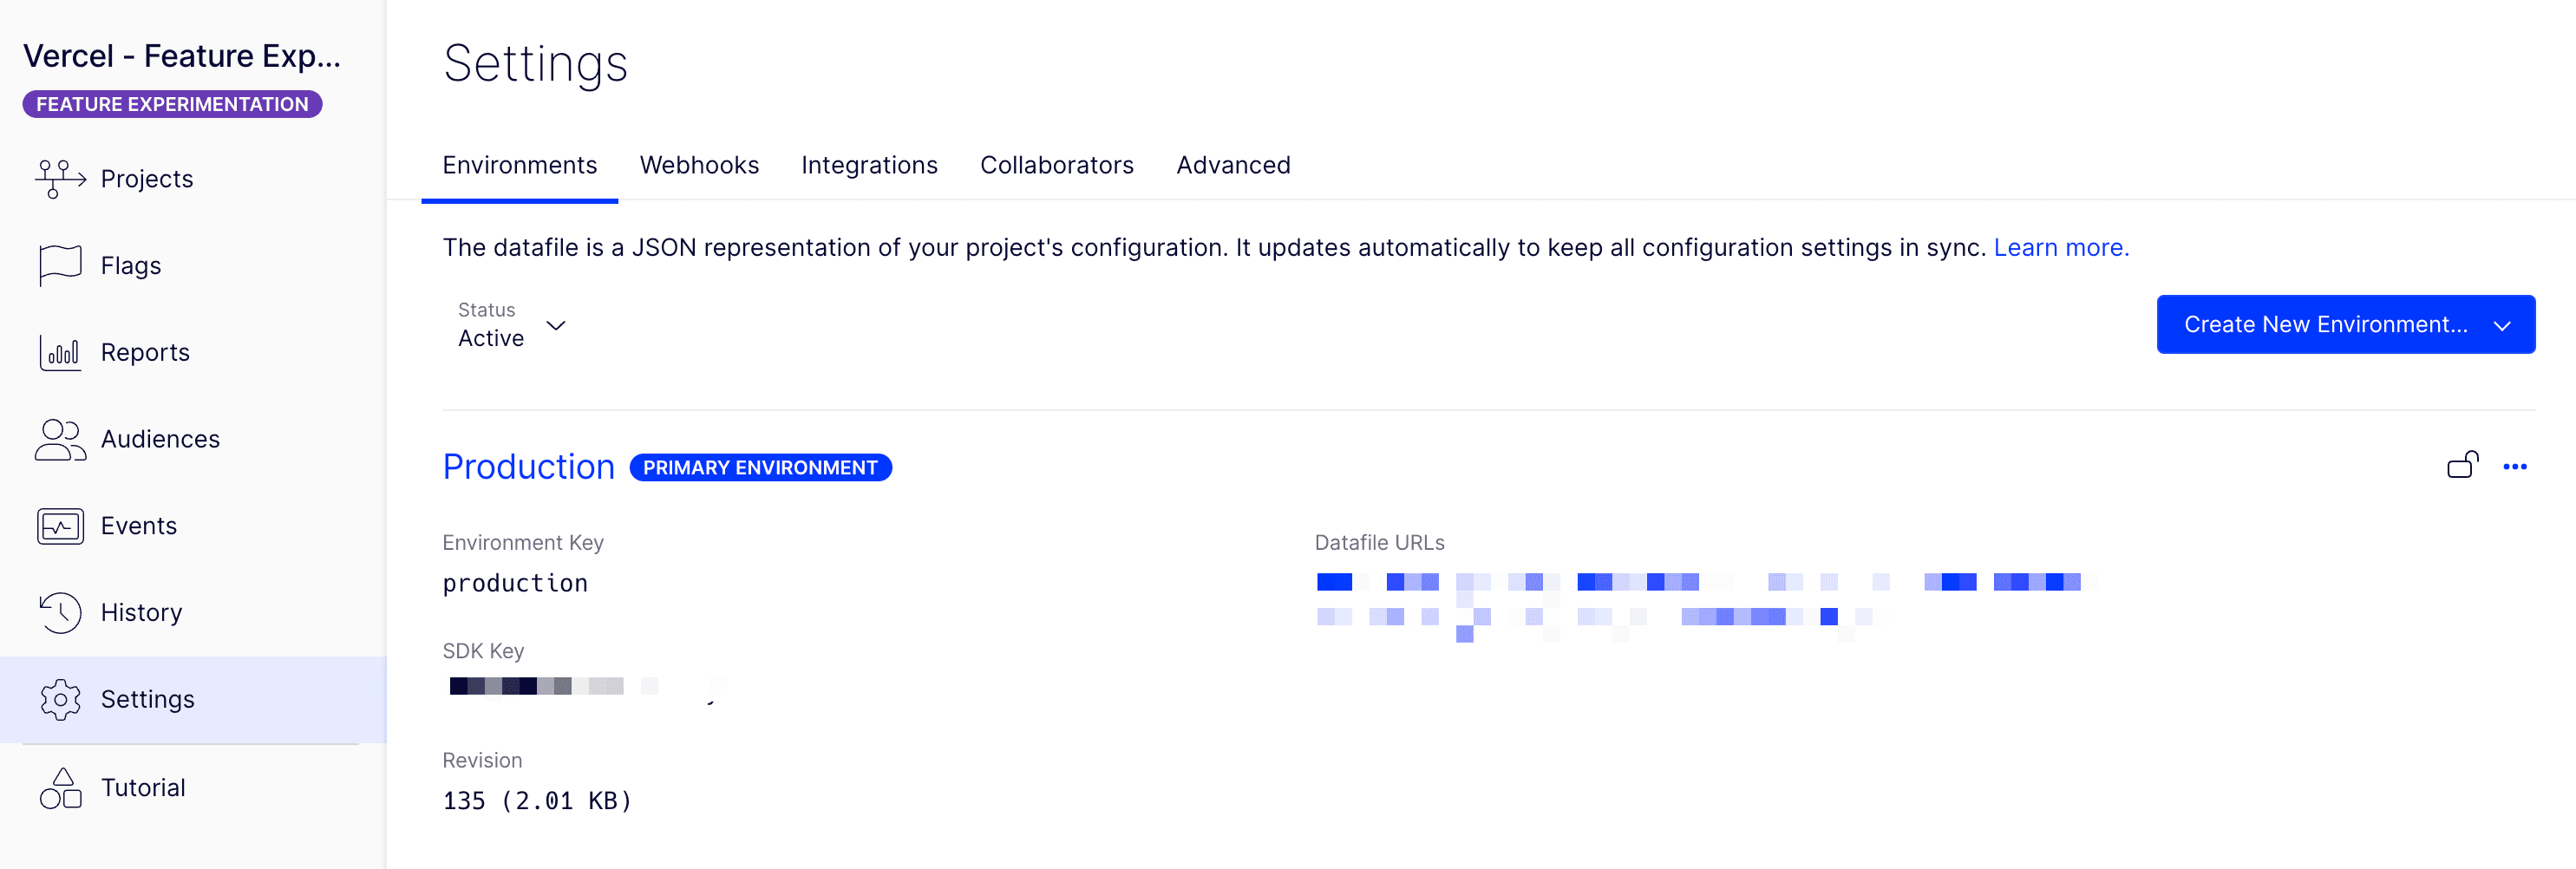
- Access your project settings from the side navigation and note the Production SDK key.
Now that you have the necessary project information for connecting to Optimizely, you're ready to clone the starter template and create a new Vercel project.
- Go to vercel-optimizely-experimentation-guide.vercel.app. This is the deployed version of the
nextjs-optimizely-experimentationGitHub repository. - Click the Vercel "Deploy" button in the header navigation to create a new Vercel project. This will clone the repository's
guidebranch and require you implement feature experimentation from scratch.
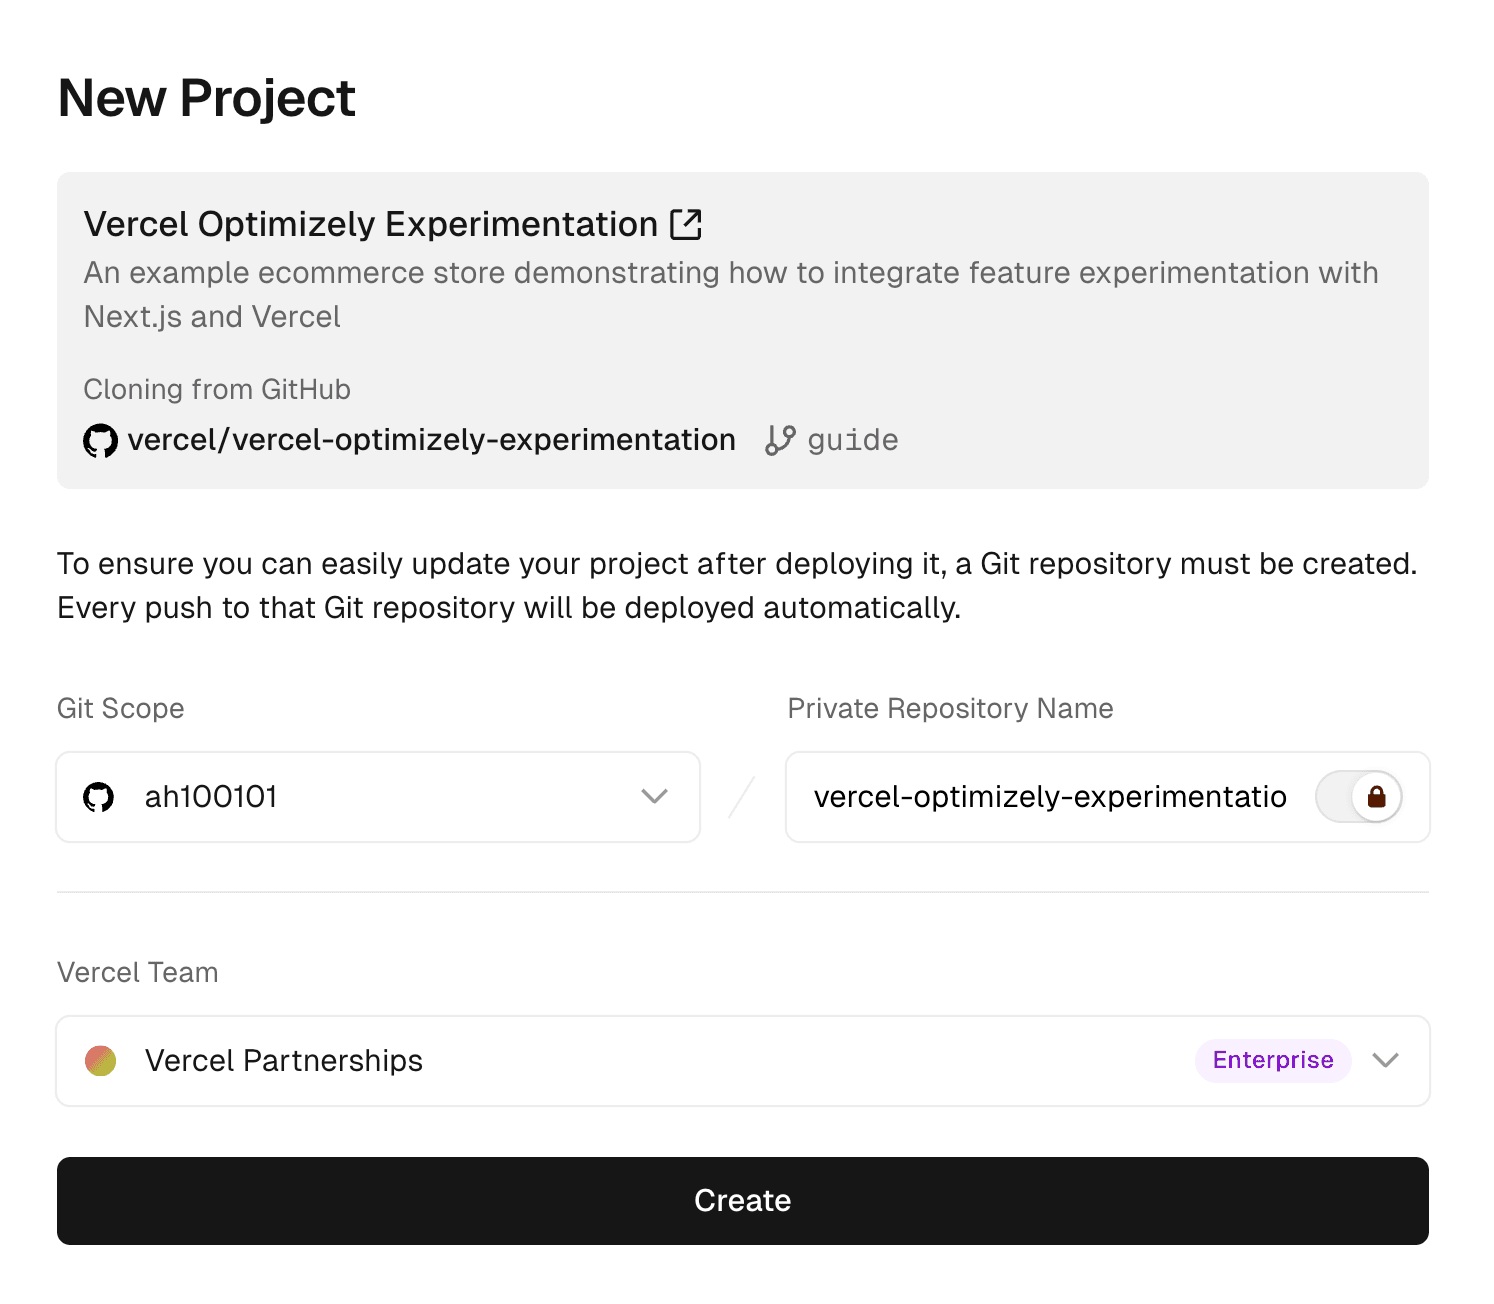
- Specify the name of the repository that should be created on your GitHub account's behalf. This will house the code for the rest of this guide. Click the create button.
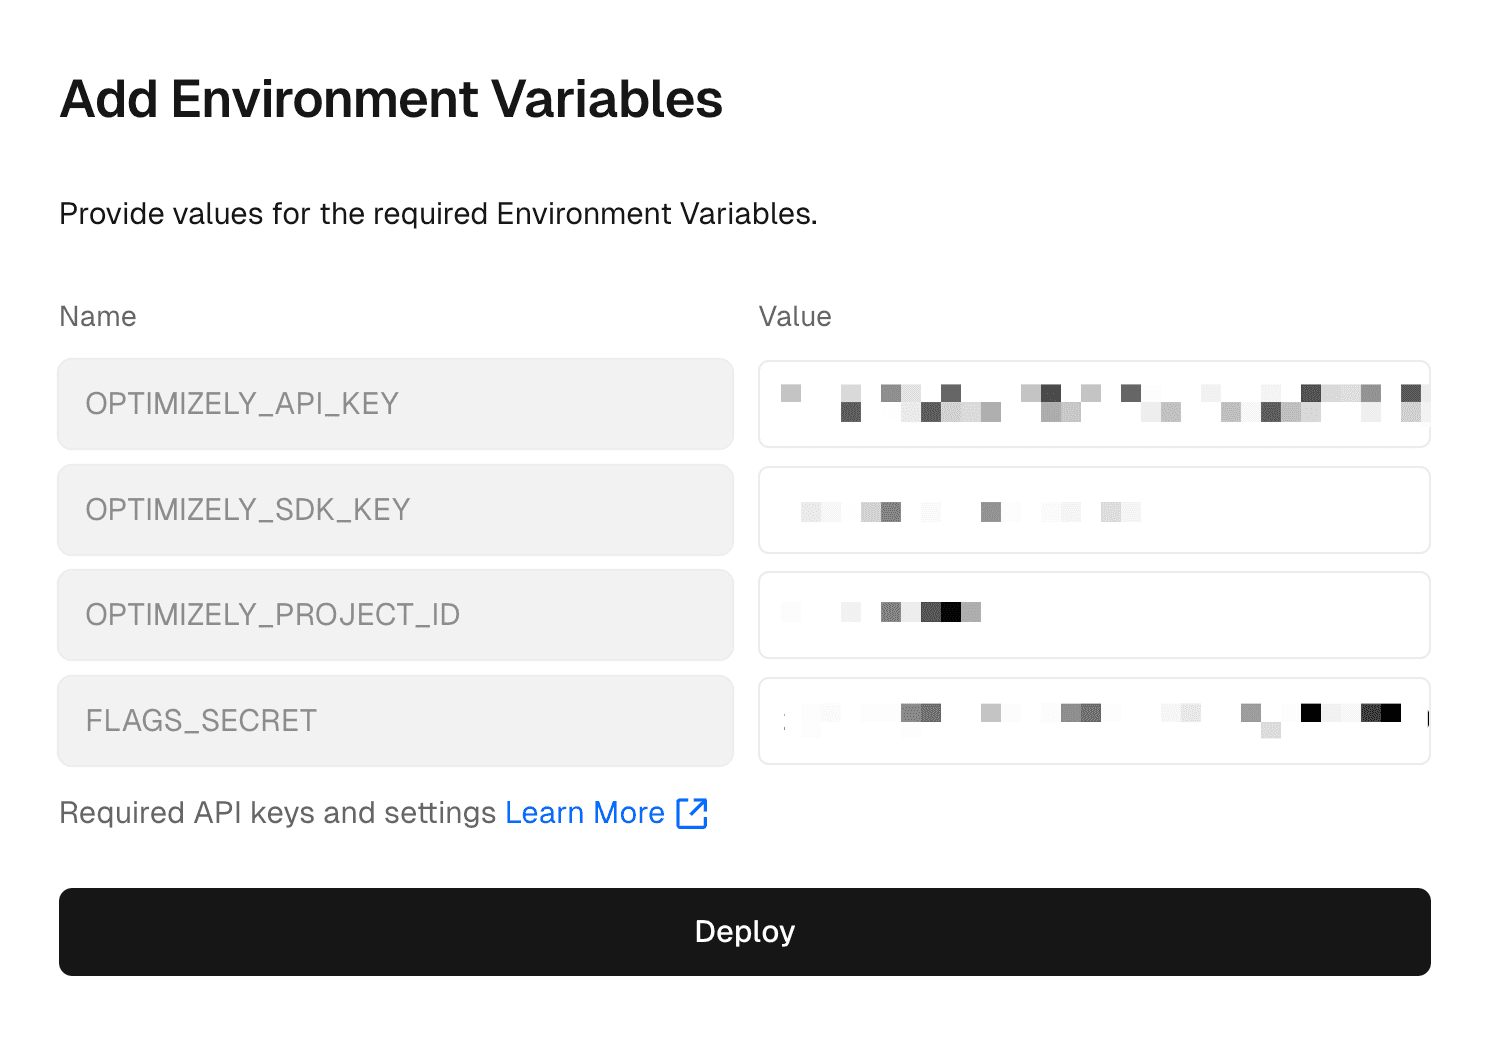
- Enter the values for the 3 required Optimizely environment variables:
OPTIMIZELY_API_KEY,OPTIMIZELY_SDK_KEY, andOPTIMIZELY_PROJECT_ID. - Set the
FLAGS_SECRETenvironment variable. This value is for encrypting feature flag values so users cannot access the Flags API endpoint. It needs to be a 32-character base64 encrypted string. A random secret can be obtained by visiting generate-secret.vercel.app/32. - When all those values are entered, click the "Deploy" button. Vercel will build and deploy your application.
- Once the deployment has finished, feel free to click around your new application. Moving forward in this guide, any pushed commit will result in a deployment, making it easy to preview and test changes individually or with colleagues.
Now that the site is running on Vercel, you will pull down the repository to your local machine and begin implementing a new feature with Optimizely.
- In your browser navigate to your new repository on GitHub that was created in the previous section.
- Note the URL or command for cloning the repository (in GitHub, this information is available by clicking the "Code" button).
- Open a terminal and change your directory to where you want this code to reside:
cd [preferred directory] - Run the clone command in this directory:
git clone [GitHub repository URL] - Open the newly cloned Next.js project in your IDE.
- Pull the environment variables locally by using the Vercel CLI:
npx vercel linknpx vercel env pull .env.local- Install the project dependencies:
pnpm install - Run the local development server:
pnpm run dev - View the local application by navigating to http://localhost:3000 in your web browser.
Congratulations! You've successfully cloned the repository locally and got the site running.
Before you define your feature flag in Next.js, set up the feature flag in Optimizely. You'll create a feature flag that not only controls the visibility of your "Buy Now" button but also allows you to experiment with different button text.
- Open app.optimizely.com in your web browser and login to your Feature Experimentation project.
- Click "Flags" in the left side navigation and click the "Create New Flag" button.
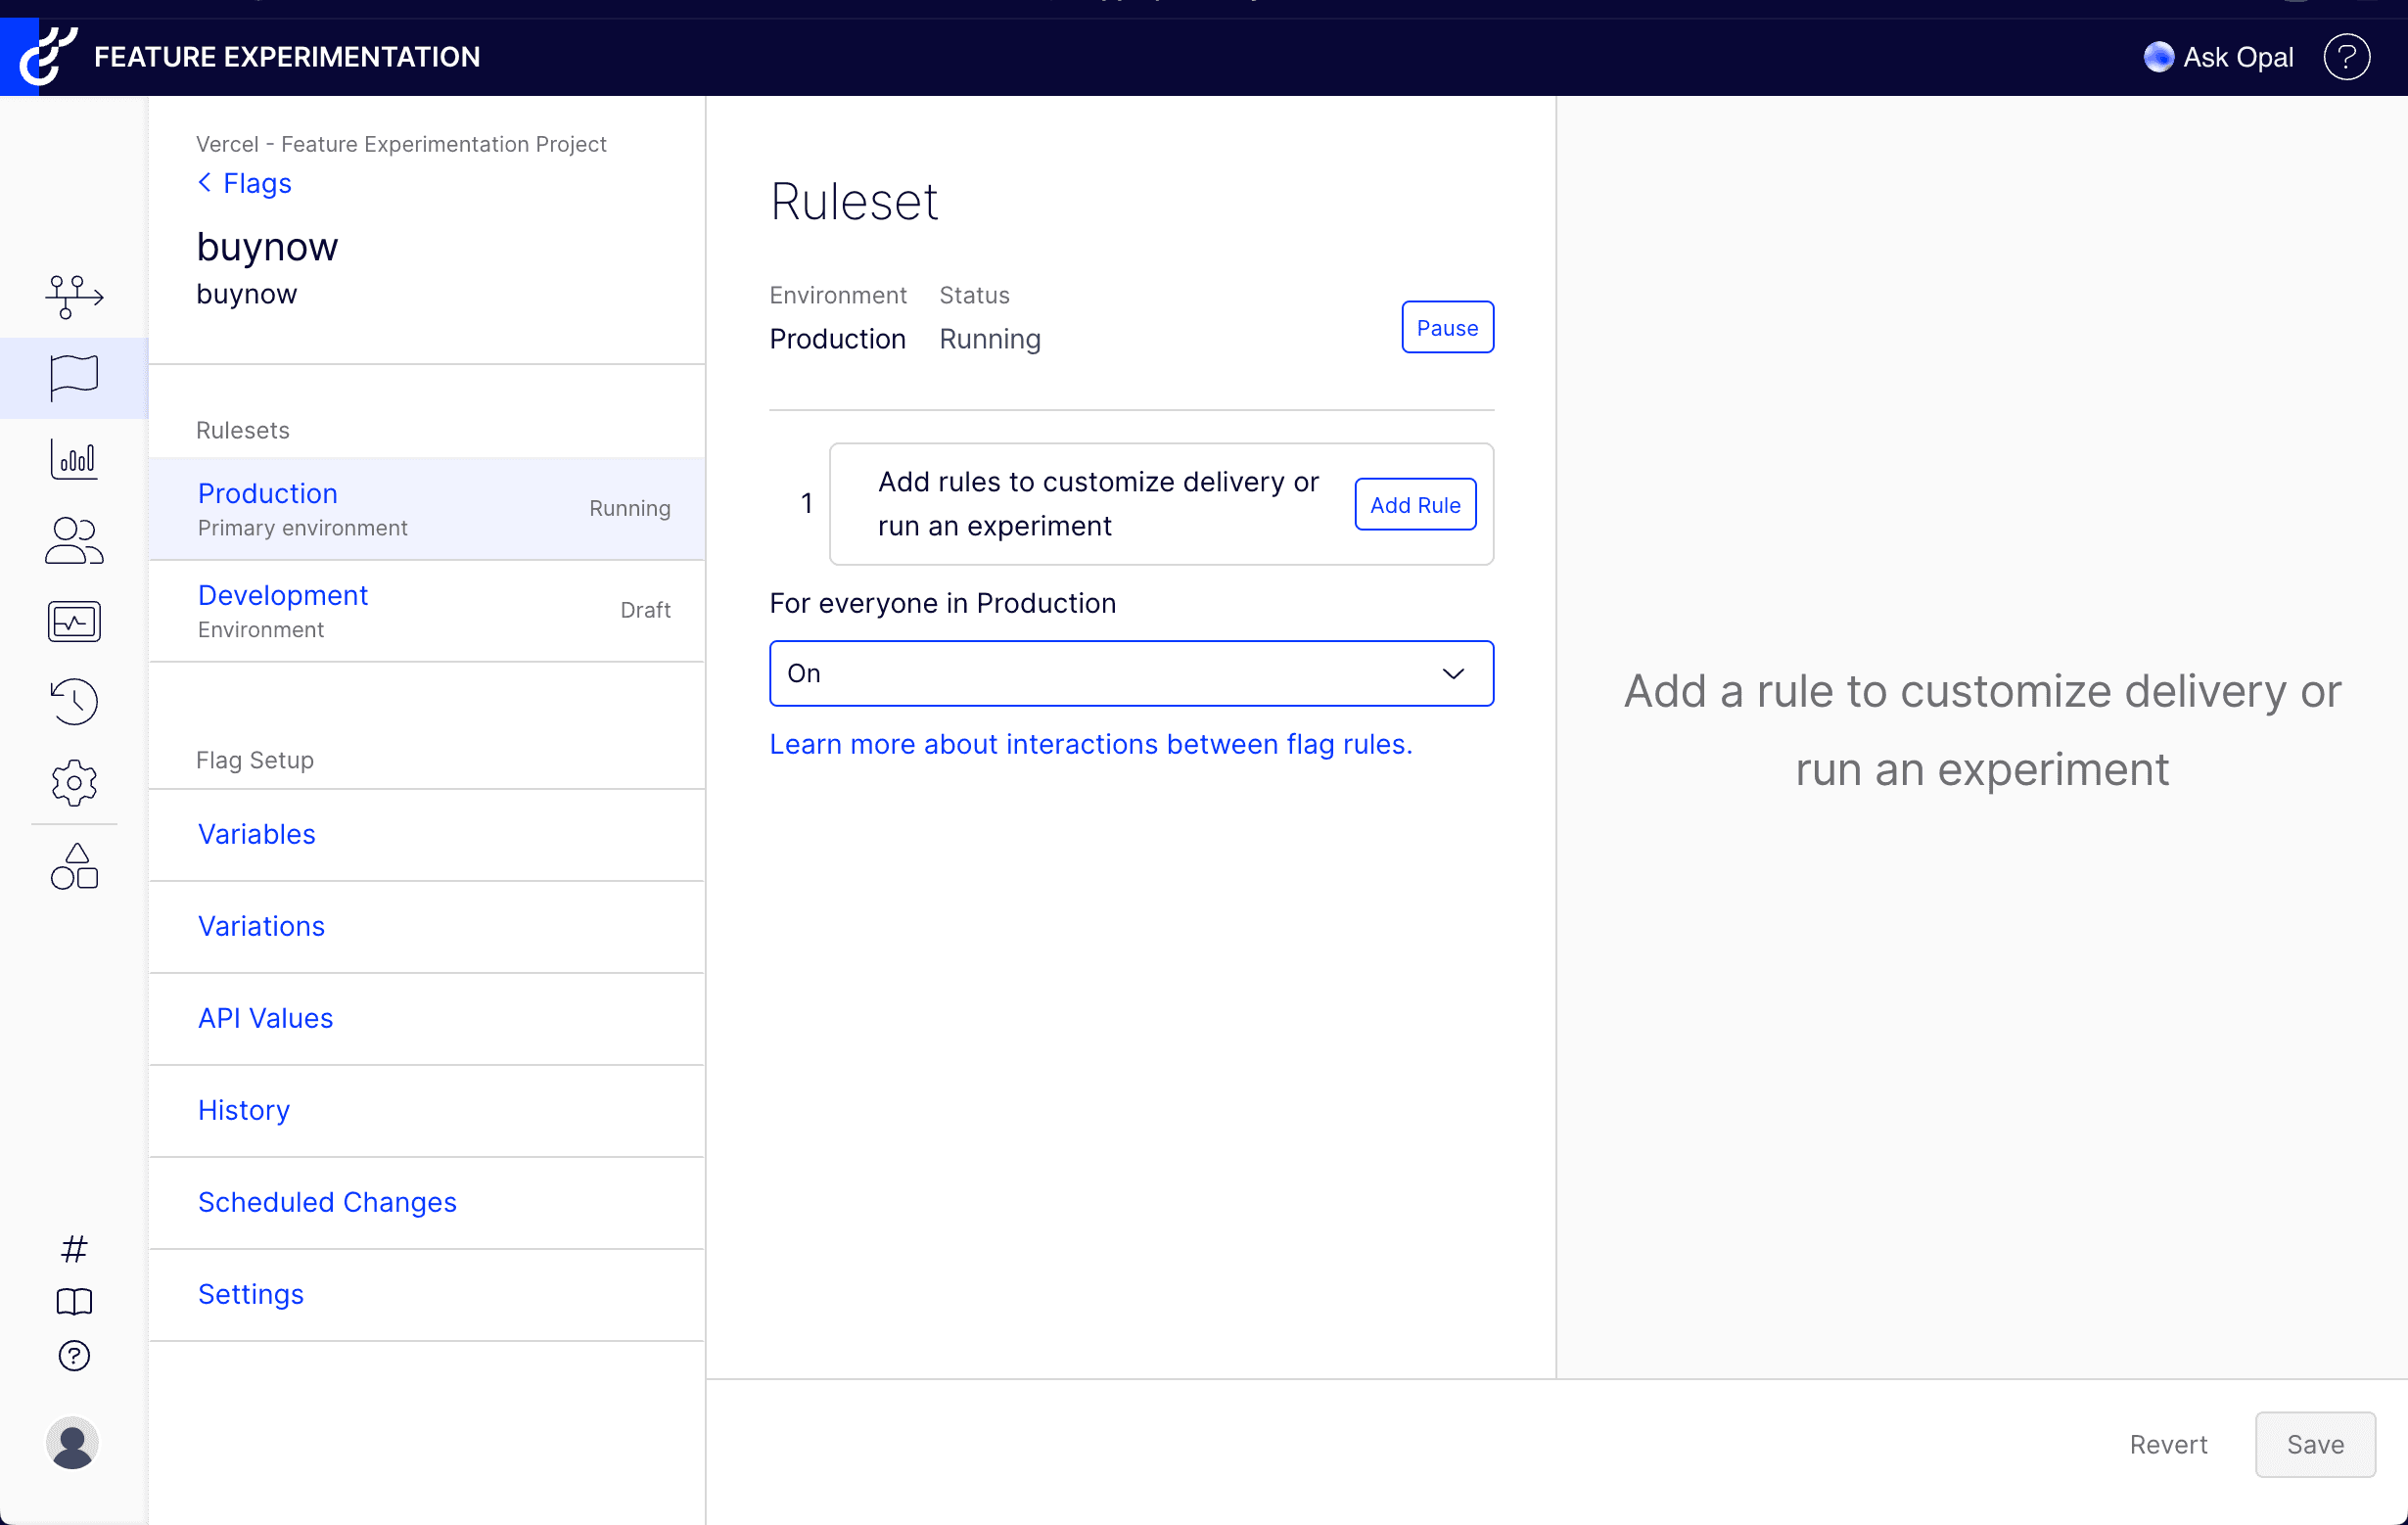
- Set the feature flag name and key to "buynow".
- Enable the feature flag for everyone in Production and save. Click "Run" so you'll see the value immediately once it is implemented later.
- Click "Variables" in the left side navigation, click "Add Variable", and select "String" as the variable type.
- Name the variable "buynow_text" and provide a default string value. You will use this to control the text of the "Buy Now" button for additional experiments. Click "Save".
- Select "Events" from the left side navigation and click the "Create New Event" button.
- Set "Event Name" and "Event Key" to "product_purchase" and click "Save Event". The template is already configured to fire this event when a user completes checkout with an example product.
For setting up your first feature flag and experiment, you will add a new "Buy Now" button on the product detail page. You can view this page locally by navigating your browser to http://localhost:3000/products/hat.
There are two key files in the project that you will use:
app/products/[slug]/page.tsx: This file contains the product detail page code and components.lib/flags.ts: This file contains feature flags defined with theflagsSDK. These flags will be visible in the Vercel toolbar, making it easy for colleagues to override and test new features.
Start by adding a "Buy Now" button to the Product Detail Page that is hidden behind a feature flag:
- Open
app/products/[slug]/page.tsxand find the location of the existingAddToCartButtoncomponent. - At the bottom of this file, define this new
Purchasecomponent using the following code snippet:
async function Purchase({ productId }: { productId: string }) { const showBuyNow = await showBuyNowFlag();
return ( <div className="flex space-x-1"> <AddToCartButton productId={productId} /> {showBuyNow && <BuyNowButton text="Buy Now" />} </div> );}- The
Purchasecomponent renders bothAddToCartButtonandBuyNowButton, but conditionally displaysBuyNowButtonbased on theshowBuyNowFlag()result. This flag is defined in the codebase and currently hardcoded tofalse. In a later step, you'll override this value using the Vercel Toolbar. - Update the page to replace the existing
AddToCartButtoncomponent with the newPurchasecomponent then save your file:
<div className="space-y-2"> <Purchase productId={product.id} /> <Link href="/cart" prefetch={true} className={`w-full ${buttonVariants({ variant: "outline" })}`}> <ShoppingCart className="w-5 h-5 mr-2" /> View Cart </Link></div>You have successfully implemented the "Buy Now" button behind a feature flag!
When you view the product detail page locally you will only see the "Add to Cart" button. You can easily test by overriding the hardcoded buyNowButton flag from false to true.
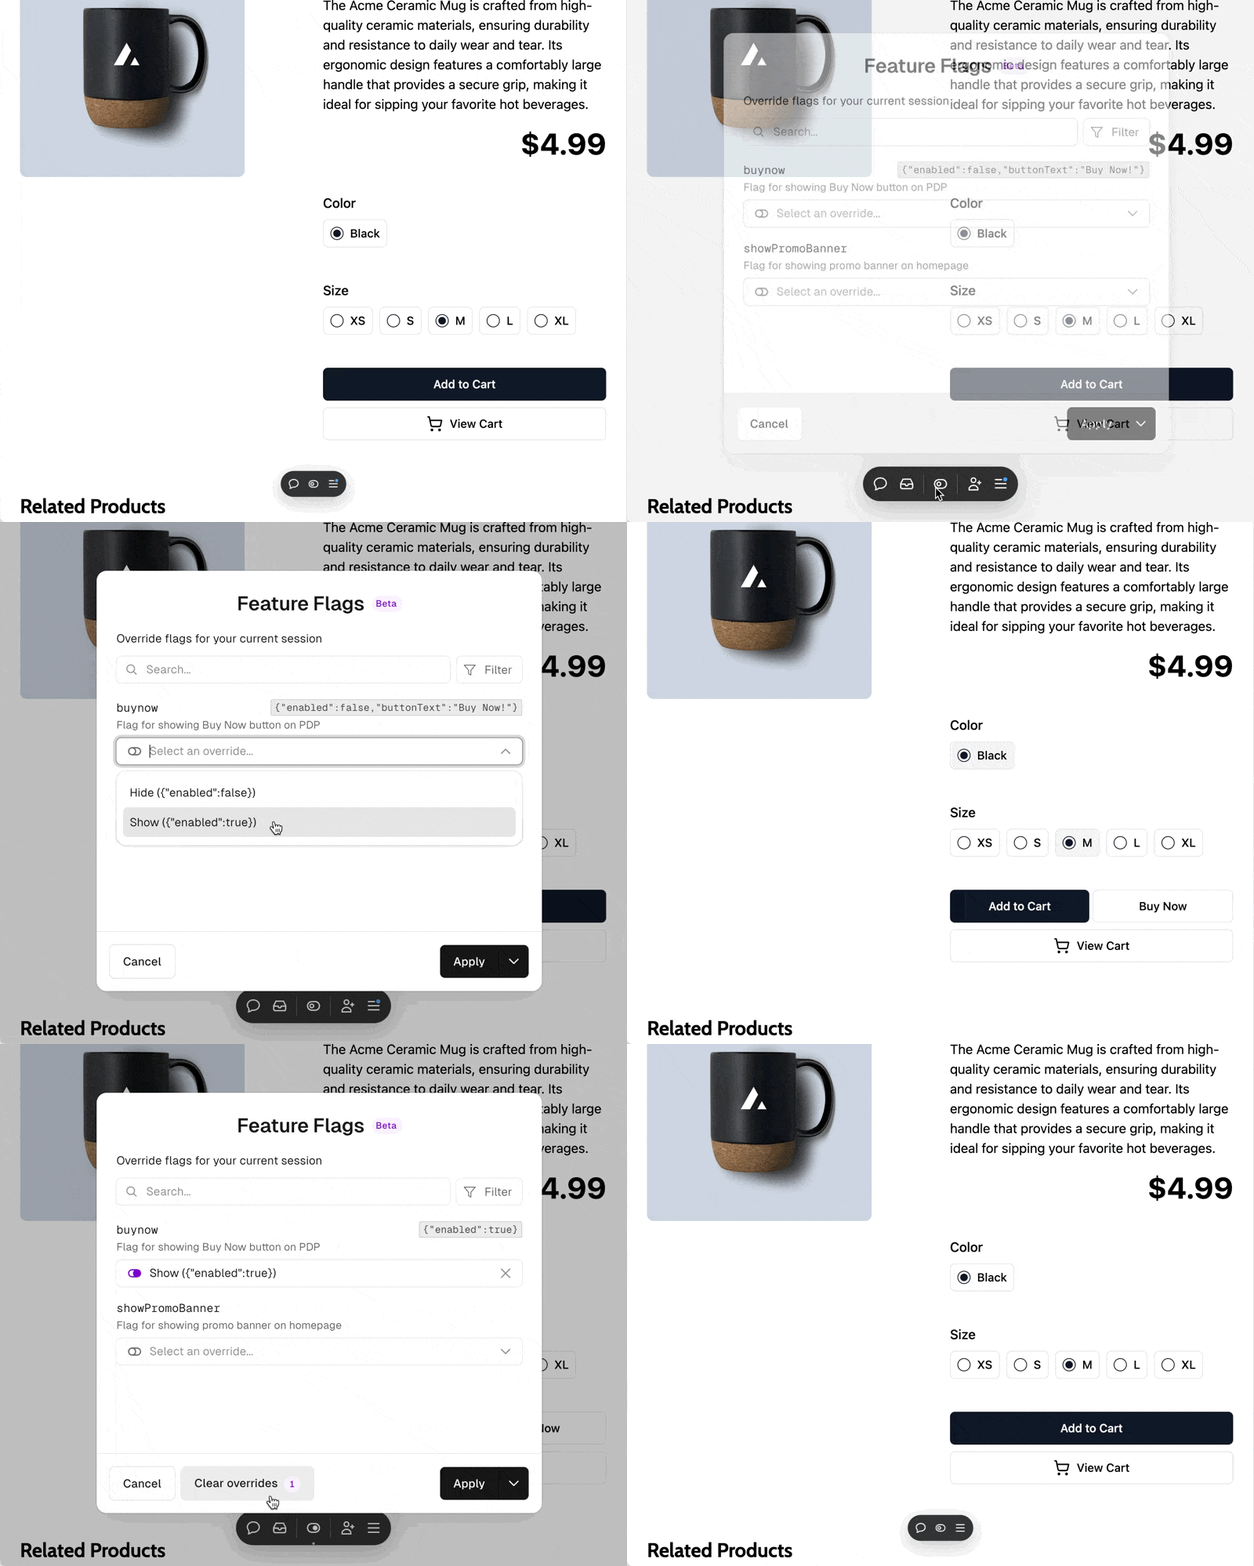
This is a powerful mechanism for engineers to implement and test features, even when hidden by default.
Now that this functionality is controlled by a feature flag, update the decide function to connect to Optimizely Feature Experimentation so you can control it dynamically and with experiments.
- Open the
lib/flags.tsfile and update theshowBuyNowButtonflag'sdecidemethod to connect to Optimizely. The following code creates an Optimizely client and then makes a decision based on the "buynow" feature flag created earlier in Optimizely.
export const showBuyNowFlag = flag<boolean>({ key: "buynow", description: "Flag for showing Buy Now button on PDP", options: [ { label: "Hide", value: false }, { label: "Show", value: true }, ], async decide({ headers }) { const client = optimizely.createInstance({ sdkKey: process.env.OPTIMIZELY_SDK_KEY!, }); if (!client) { throw new Error("Failed to create client"); } await client.onReady(); const shopper = getShopperFromHeaders(headers); const context = client.createUserContext(shopper); if (!context) { throw new Error("Failed to create user context"); } const decision = context.decide("buynow"); const flag = decision.enabled; return flag; }});- Save and view the page. The "Buy Now" button is displayed since you enabled this feature flag in Optimizely earlier (be sure to clear any overrides in the toolbar). You have successfully connected to Optimizely!
Your application is now retrieving decisions from Optimizely. However, this third-party dependency currently blocks the render of the page. Next, you will address this by using a suspense boundary to load the page immediately, and then stream in this component when it's ready.
- Start by updating the product detail page to wrap the
Purchasecomponent insuspense:
<div className="space-y-2"> <Suspense fallback={<ButtonSkeleton />}> <Purchase productId={product.id} /> </Suspense> <Link href="/cart" prefetch={true} className={`w-full ${buttonVariants({ variant: "outline" })}`}> <ShoppingCart className="w-5 h-5 mr-2" /> View Cart </Link></div>- Save and view the page.
The page now loads instantly. By using a ButtonSkeleton placeholder in the fallback prop, we've created a smooth loading state that prevents layout shift. This solution combines fast page loading with a stable user interface. Users can confidently interact with the page, knowing it won't suddenly shift or change unexpectedly.
You now have a feature flag in Next.js driven by Optimizely that follows performance and user experience best practices. However, you can do more than just hiding or showing the component. You can control behavior as well. Next, integrate the Optimizely "buynow_text" variable so you can experiment and see which button text values have the best conversion.
- Open the
lib/flags.tsfile and update thedecidefunction to return an object containing the text of the button and whether it should be shown to the user:
export const showBuyNowFlag = flag<{ enabled: boolean; buttonText?: string;}>({ key: "buynow", description: "Flag for showing Buy Now button on PDP", options: [ { label: "Hide", value: { enabled: false } }, { label: "Show", value: { enabled: true } }, ], async decide({ headers }) { const client = optimizely.createInstance({ sdkKey: process.env.OPTIMIZELY_SDK_KEY!, }); if (!client) { throw new Error("Failed to create client"); } await client.onReady(); const shopper = getShopperFromHeaders(headers); const context = client.createUserContext(shopper); if (!context) { throw new Error("Failed to create user context"); } const decision = context.decide("buynow"); const flag = { enabled: decision.enabled, buttonText: decision.variables.buynow_text as string, }; return flag; },});- Update the
app/products/[slug]/page.tsxfile to use the new object returned bydecideto both show the button and set its text:
async function Purchase({ productId }: { productId: string }) { const showBuyNow = await showBuyNowFlag(); const buttonText = showBuyNow?.buttonText || "Buy Now"; return ( <div className="flex space-x-1"> <AddToCartButton productId={productId} /> {showBuyNow.enabled && <BuyNowButton text={buttonText} />} </div> );}- Save and view the page. You now have the ability to not just hide or show the button but also set up variations with different text. This functionality can be used for any behavior and is not limited to text.
You now have everything configured to run experiments with Optimizely. Follow these steps to run a simple A/B test:
- Navigate to app.optimizely.com and the "buynow" feature flag created earlier.
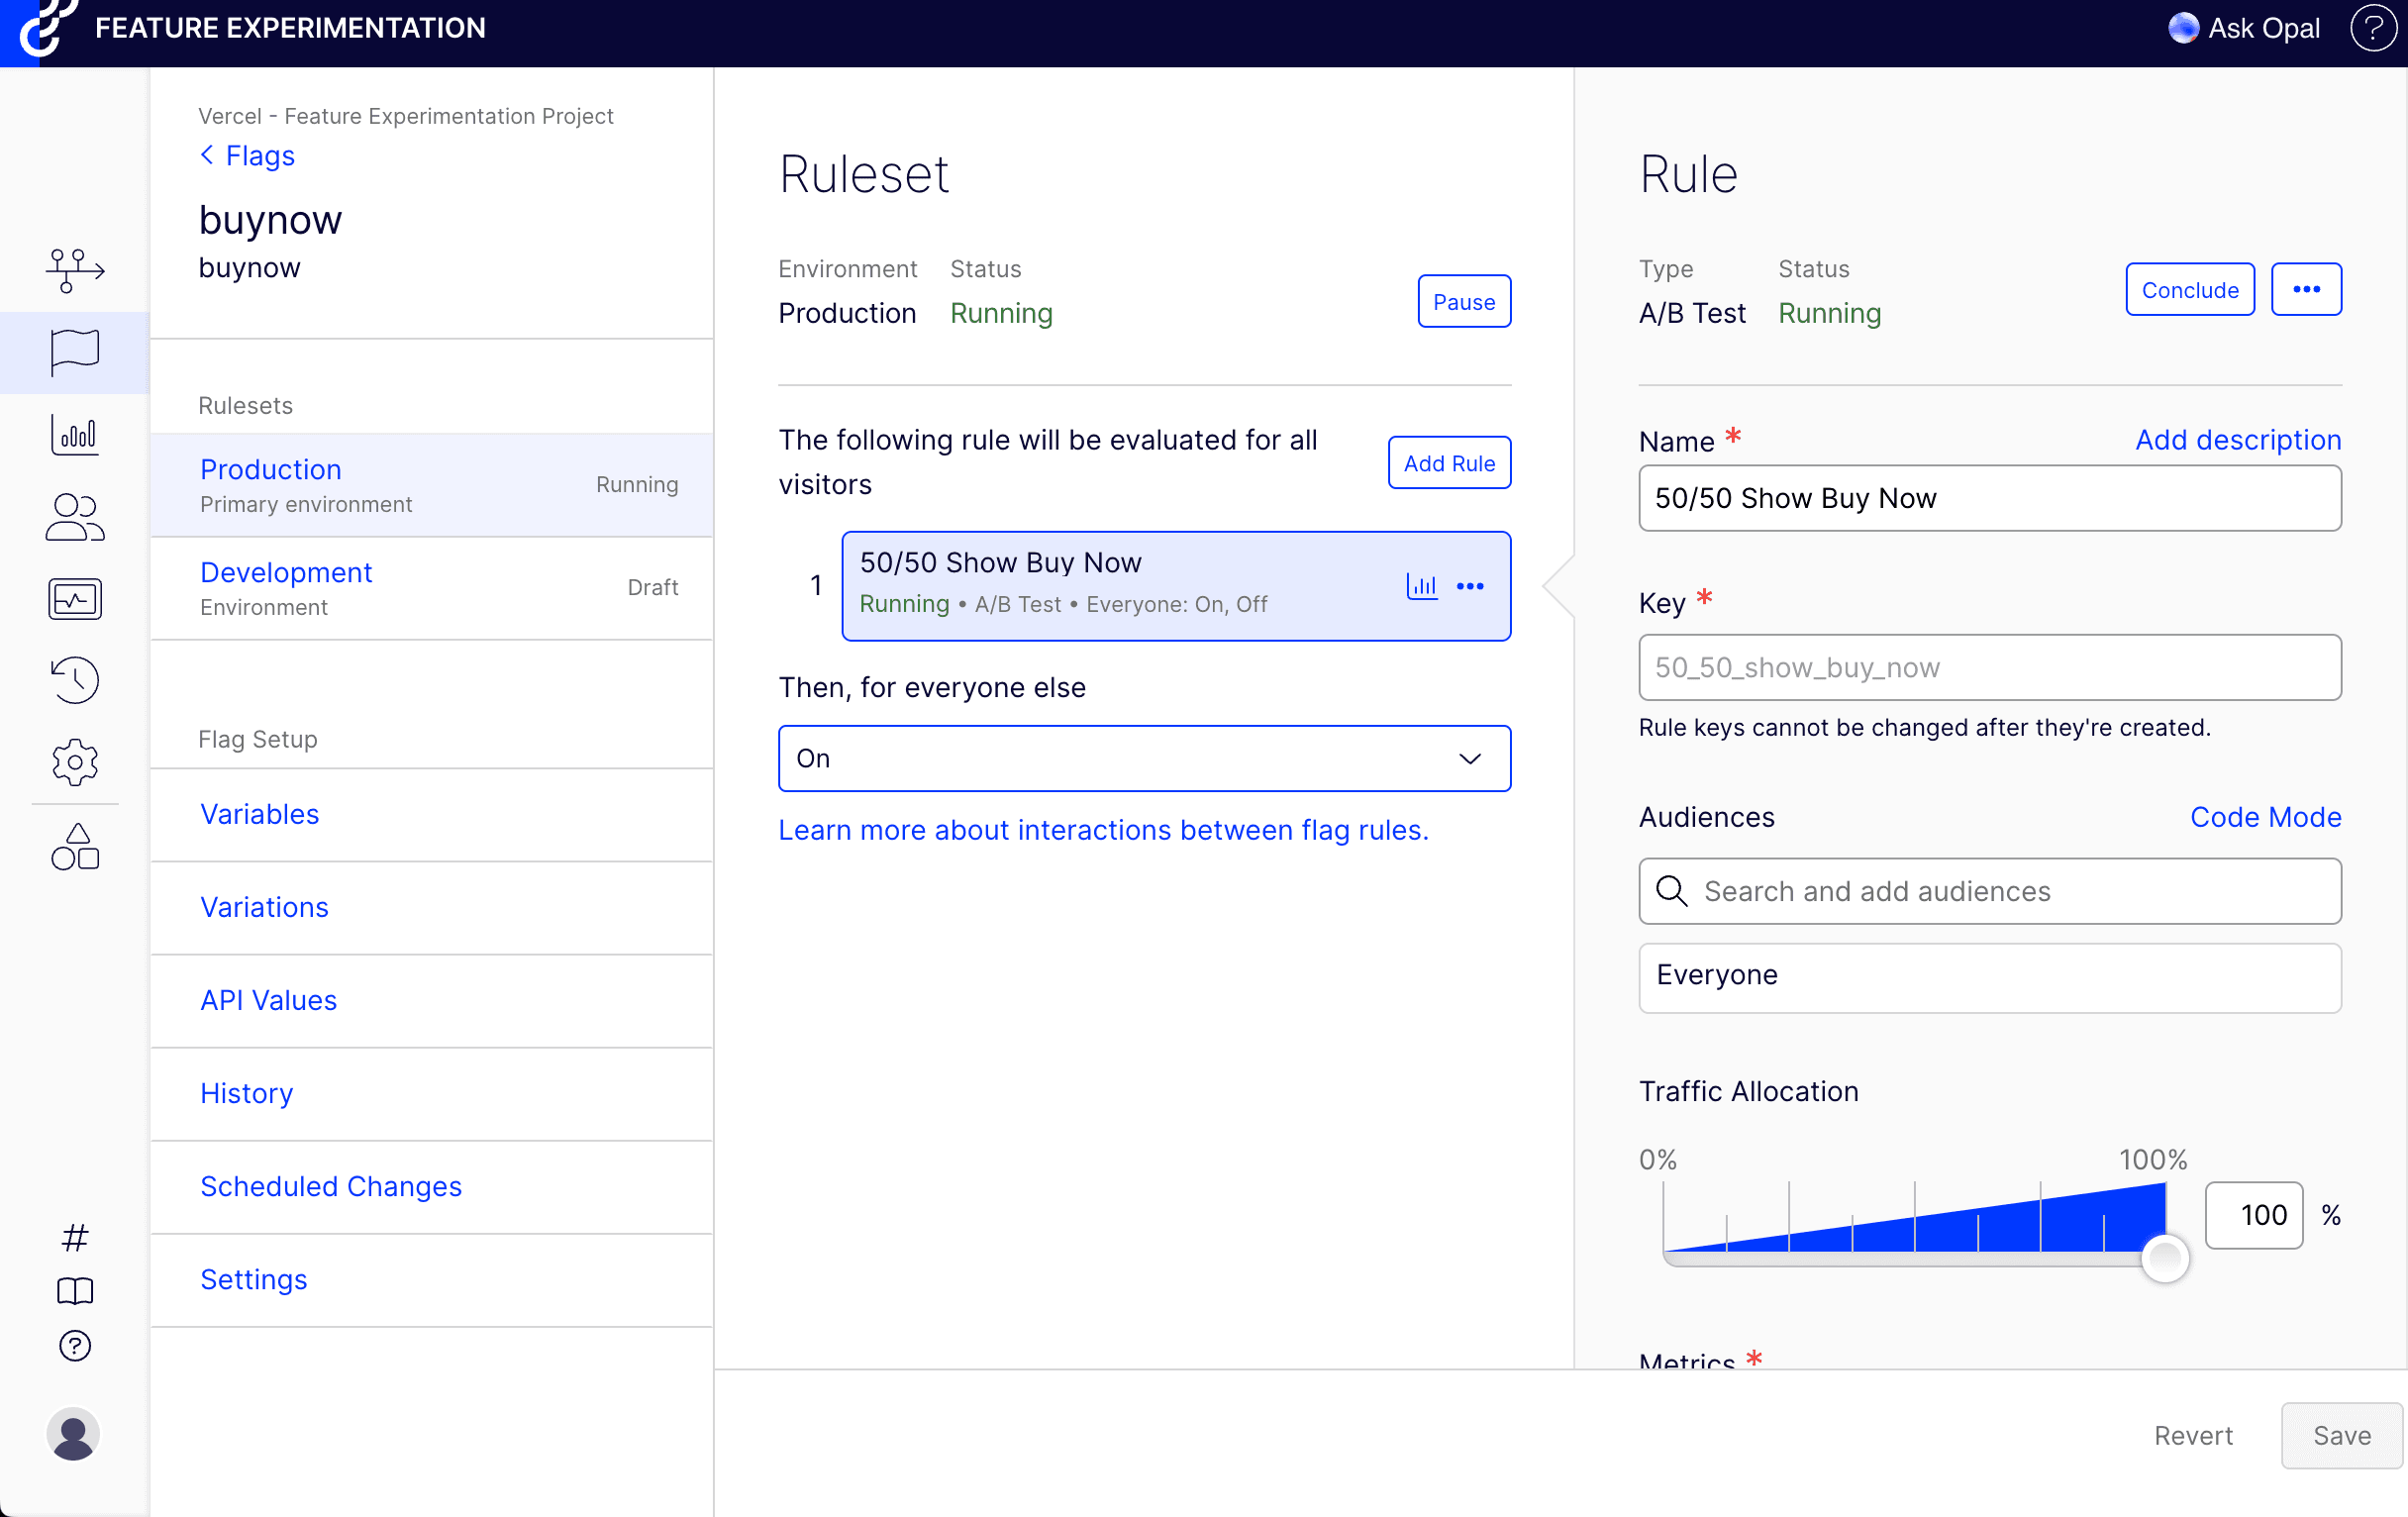
- From the feature flag page, click "Add Rule" then "A/B Test".
- Provide a name for the experiment (e.g. "50/50 Show Buy Now").
- Select the "product_purchase" event under metrics.
- Create two variants. Set one to have "buynow" set to "Off" and the other to "On".
- Click "Save" and then "Run".
Now that the experiment is running, go to the product detail page. You will see one of the two variations configured.
shopper cookie to ensure that a visitor remains in the same context so they don't see a different UI every time they refresh. You can test experiment variations by clearing your cookies and seeing whether you receive another variation on refresh.Congratulations, you are now running an Optimizely A/B test for the Buy Now button! When a demo product is purchased, the product_purchase event will be tracked and visible in Optimizely when the data is aggregated. You can now verify the business impact of new behavior and features!
You have finished implementing your integration and can now deploy to Vercel to test further and run experiments in production.
- Commit your changes:
git add .git commit -m "Implemented Optimizely feature experimentation"- Push your changes to GitHub:
git push origin main- Vercel will automatically start a new production deployment. You can monitor the deployment progress in your Vercel dashboard.
In this guide, you integrated Optimizely Feature Experimentation with a Next.js application deployed on Vercel. You implemented a feature flag to control the visibility and text of a "Buy Now" button, created an A/B test in Optimizely, and by using the latest features of Next.js ensured that the implementation follows best practices for performance and user experience.
To dive deeper into this solution consider reviewing the following documentation and workshop:
- Workshop: Enabling frontend teams with fast and safe experimentation
- Vercel Feature Flags documentation
- Vercel Toolbar documentation
To optimize your solution further, consider integrating Vercel Edge Config with Optimizely webhooks. This will allow Optimizely to proactively push experiment data to Vercel and enable even faster experimentation with precomputed flags.
By following these practices, you can leverage the power of feature experimentation while maintaining a fast, responsive, and user-friendly application. Happy experimenting!