A recent federal ruling has made it possible for iOS developers to integrate external web checkouts directly into their apps without triggering Apple’s "scare" screens or giving up a 30% cut to Apple for using in-app purchases. This means you can run your own checkout and gain full control over pricing, margins, and payment methods. Apple Pay on the web continues to work, so users still get a smooth and convenient experience.
To dive deeper into what this ruling means for developers, check out our blog post.
In this guide, you'll learn how to deploy the Paddle in-app checkout starter template to Vercel. Built with Next.js and hosted on Vercel, this template takes you from zero to a fully functional web checkout using Apple Universal Links. It’s ready to integrate with your iOS app for a native-feeling external checkout experience.
This solution offers a fast, secure, and customizable checkout flow that works across devices. Paddle handles payments, subscriptions, fraud prevention, and global tax compliance. Vercel provides built-in analytics, global performance, and automatic deployments, helping you optimize conversions, ship updates quickly, and focus on your product. You retain control over pricing, own the customer relationship, and keep the revenue that would otherwise go to platform fees.
Here's what you'll do in this guide:
- Set up your Paddle account and product pricing
- Deploy the starter template to Vercel
- Link your iOS app using Universal Links
- Handle purchase fulfillment via RevenueCat or webhooks
- Customize the design and behavior of your checkout flow
This guide assumes you already have a basic iOS app with in-app purchases. Our focus will be on setting up a decoupled checkout experience using a Next.js template hosted on Vercel.
To get started, make sure you have the following:
- A Git provider supported by Vercel (e.g., GitHub, GitLab, Bitbucket)
- A Vercel account linked to your Git provider
- A Paddle account with access to both sandbox and production environments
- Node.js or a compatible runtime like Bun
- A package manager such as
npm,yarn, orpnpm - Access to your iOS app project in Xcode, React Native, or Expo
- Your Apple Developer Team ID
- Your app’s Bundle Identifier
- A registered URL scheme or Universal Links
- The Associated Domains capability enabled in your app
- Format:
applinks:your-vercel-domain
Once you have everything in place, we’ll start by setting up your Paddle account and configuring your products and pricing.
Start by creating a Paddle Billing account. Once you’re signed in, use the dashboard to define your products, pricing, and the client token that you'll need later for integration.
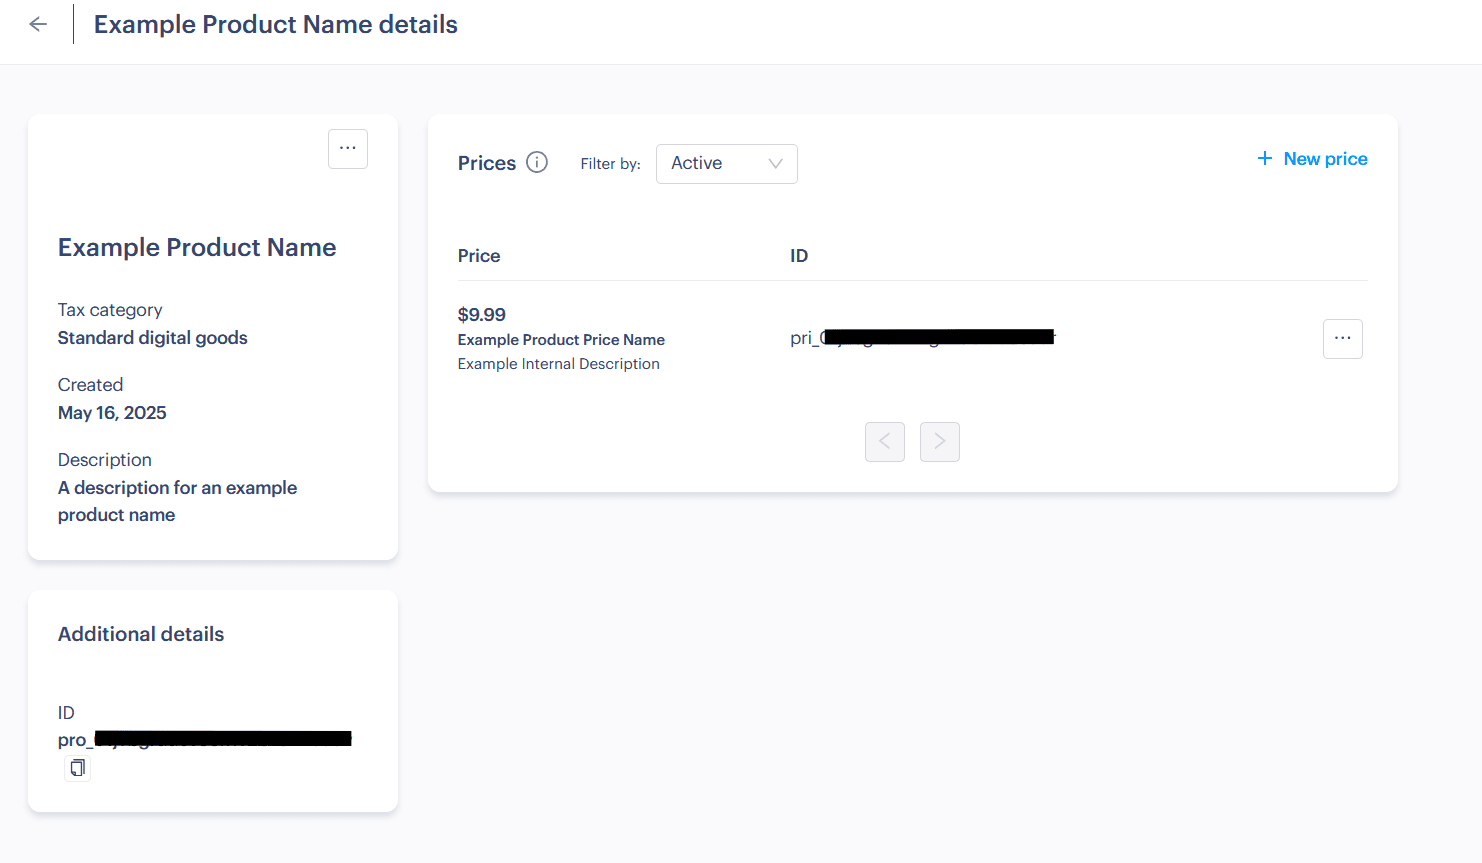
From the main navigation, go to Catalog → Products and create a new product. Add a name, tax category, description, and any optional metadata that you might need.
After the product is saved, add a price. Set the amount, choose whether it's recurring or one-time, and configure any billing intervals, trial periods, or quantity limits.
Once saved, copy the generated Price ID. It will look something like pri_XXXXXX.
Next, generate a client-side token. Go to Developer Tools → Authentication, then open the Client-side tokens section. Create a new token and save it. It will look like live_XXXXXXXXXX.
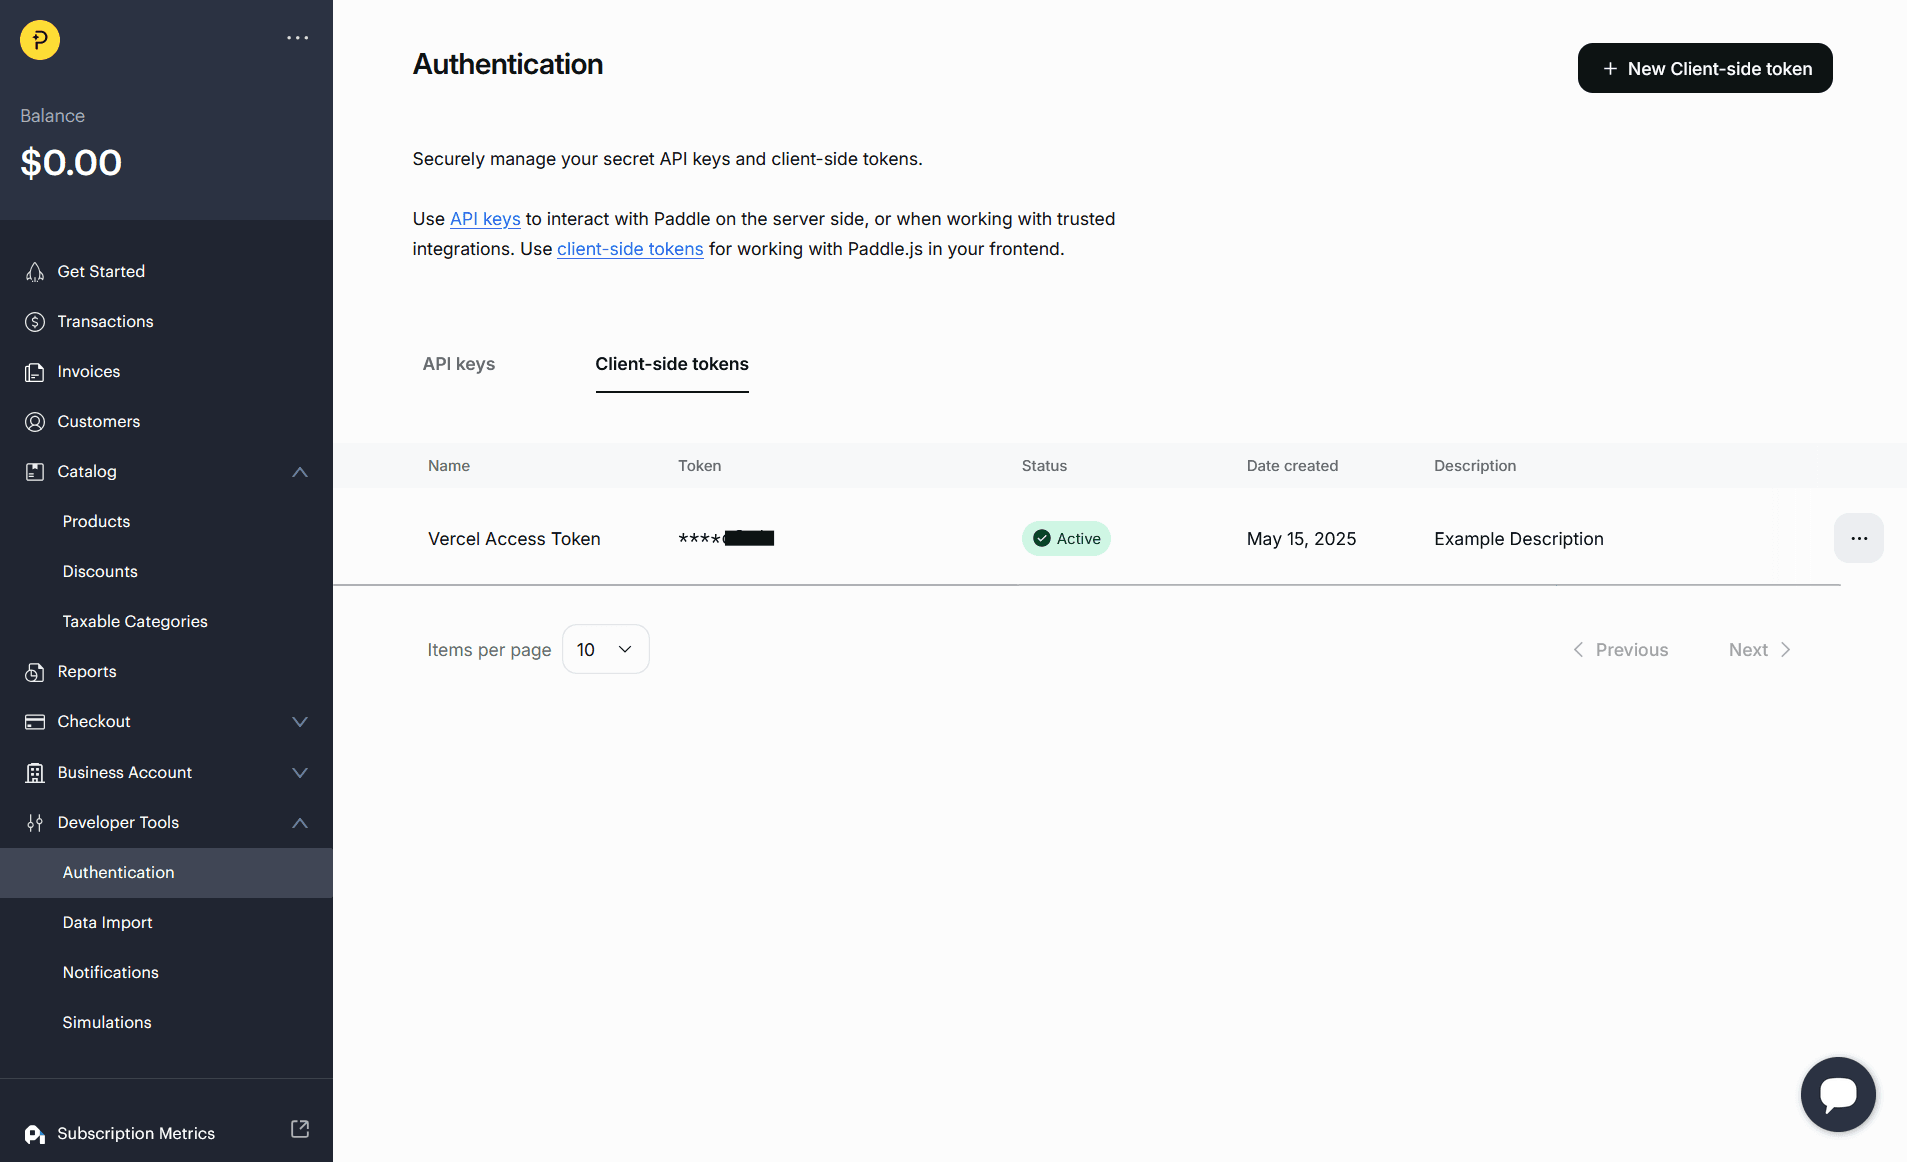
You’ll use both the price ID and the client token when deploying the app in the next step.
The Paddle checkout starter has a one-click deploy option that sets up a new project and instantly hosts it with a live preview URL. You’ll be prompted to choose your Git provider and import the template into a new repository.
During deployment, you’ll configure a few environment variables using the values from earlier.
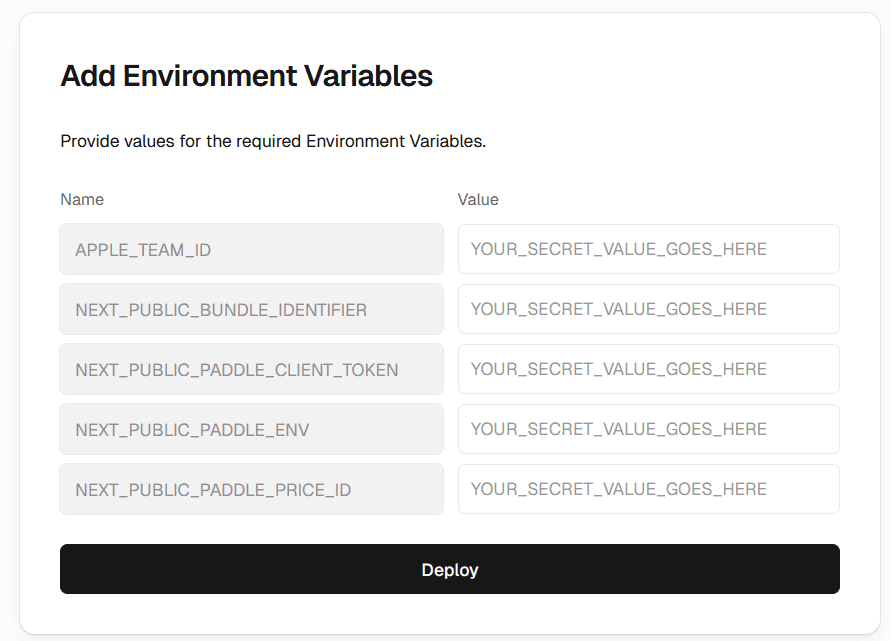
NEXT_PUBLIC_PADDLE_CLIENT_TOKEN: Your client-side token (e.g.live_xxxxxxxx)NEXT_PUBLIC_PADDLE_ENV: Set to eithersandboxorproductionNEXT_PUBLIC_PADDLE_PRICE_ID: From the product you created (e.g.pri_xxxxxxxx)
APPLE_TEAM_ID: Your Apple Developer Team IDNEXT_PUBLIC_BUNDLE_IDENTIFIER: Your app’s bundle identifier (e.g.com.example.app)
Once the deployment completes, Vercel will provide a live URL where your checkout is hosted. If your Paddle account isn’t fully configured yet, you may see an error here. Don’t worry, it’ll be resolved in the next step.

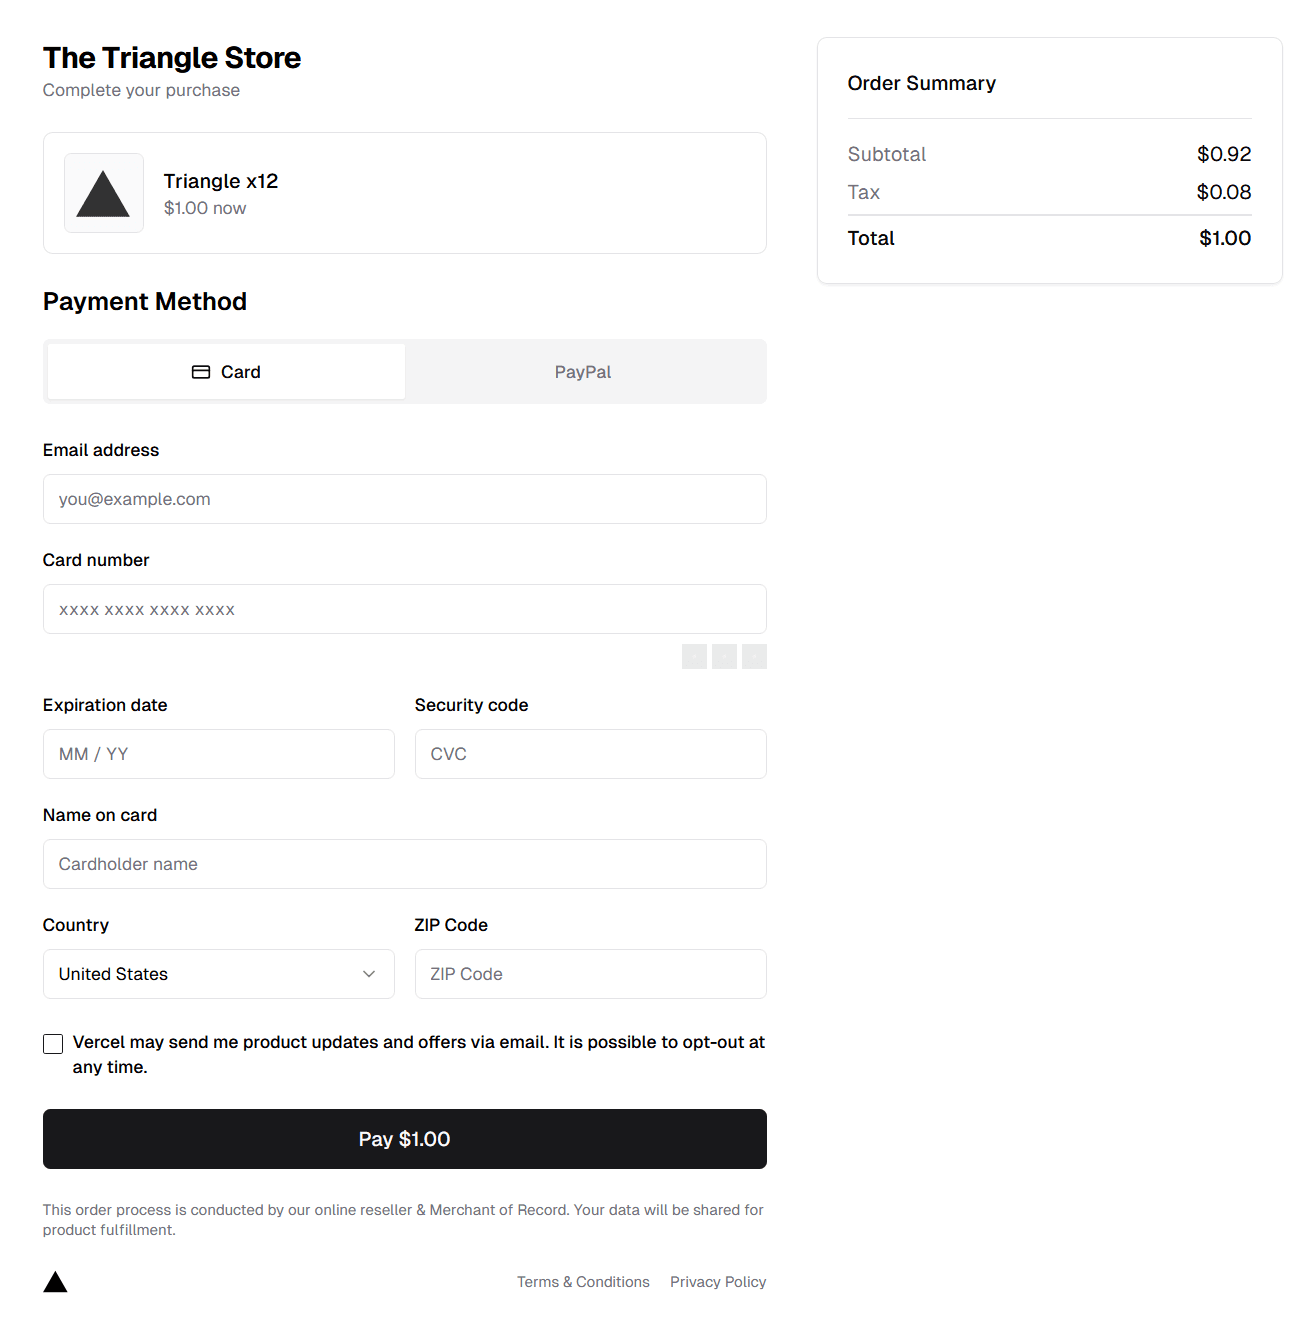
To test the flow, you can use Paddle's sandbox test card: 4242 4242 4242 4242, any future expiration date, and 100 as the CVC.
To allow Paddle to serve your checkout, you’ll need to approve your domain and set it as the default payment link.
In the Paddle dashboard, go to Checkout → Website Approval and add your deployed domain. For example, if your Vercel deployment is at vercel-paddle-checkout-starter.vercel.app, use that.
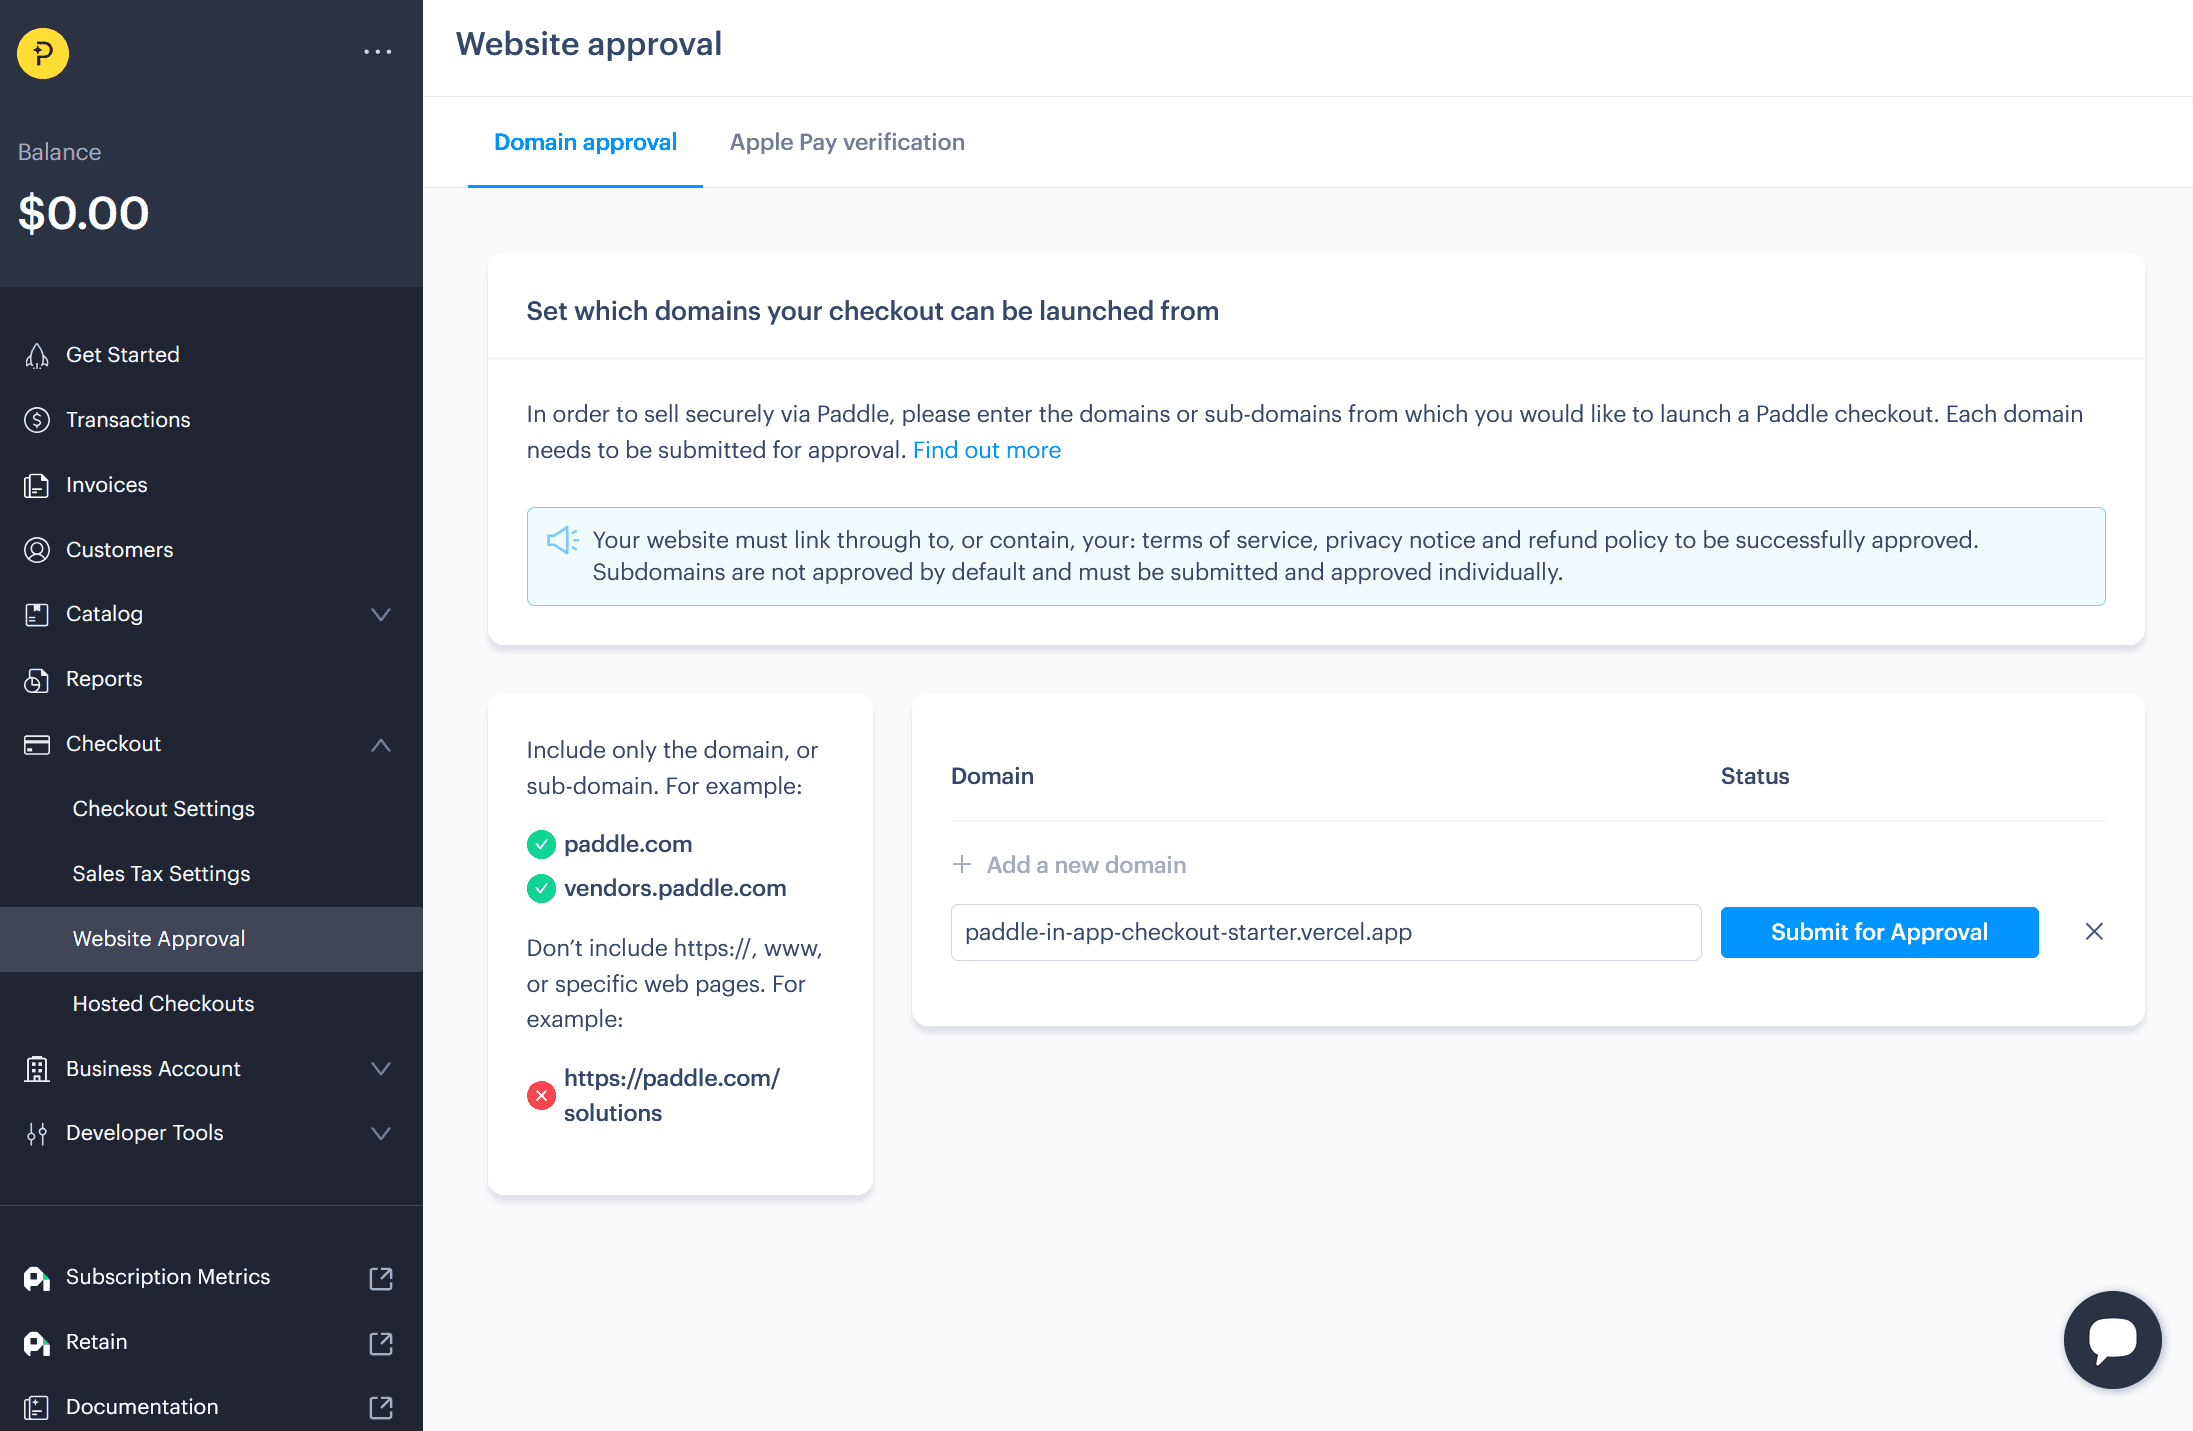
If you're using the sandbox environment, approval is instant. In production, approval requires a manual review. For this guide, we’ll use sandbox for instant setup.
Next, open Checkout → Checkout Settings and set your Default payment link to your deployed Vercel URL. This tells Paddle where to send users during checkout initialization.
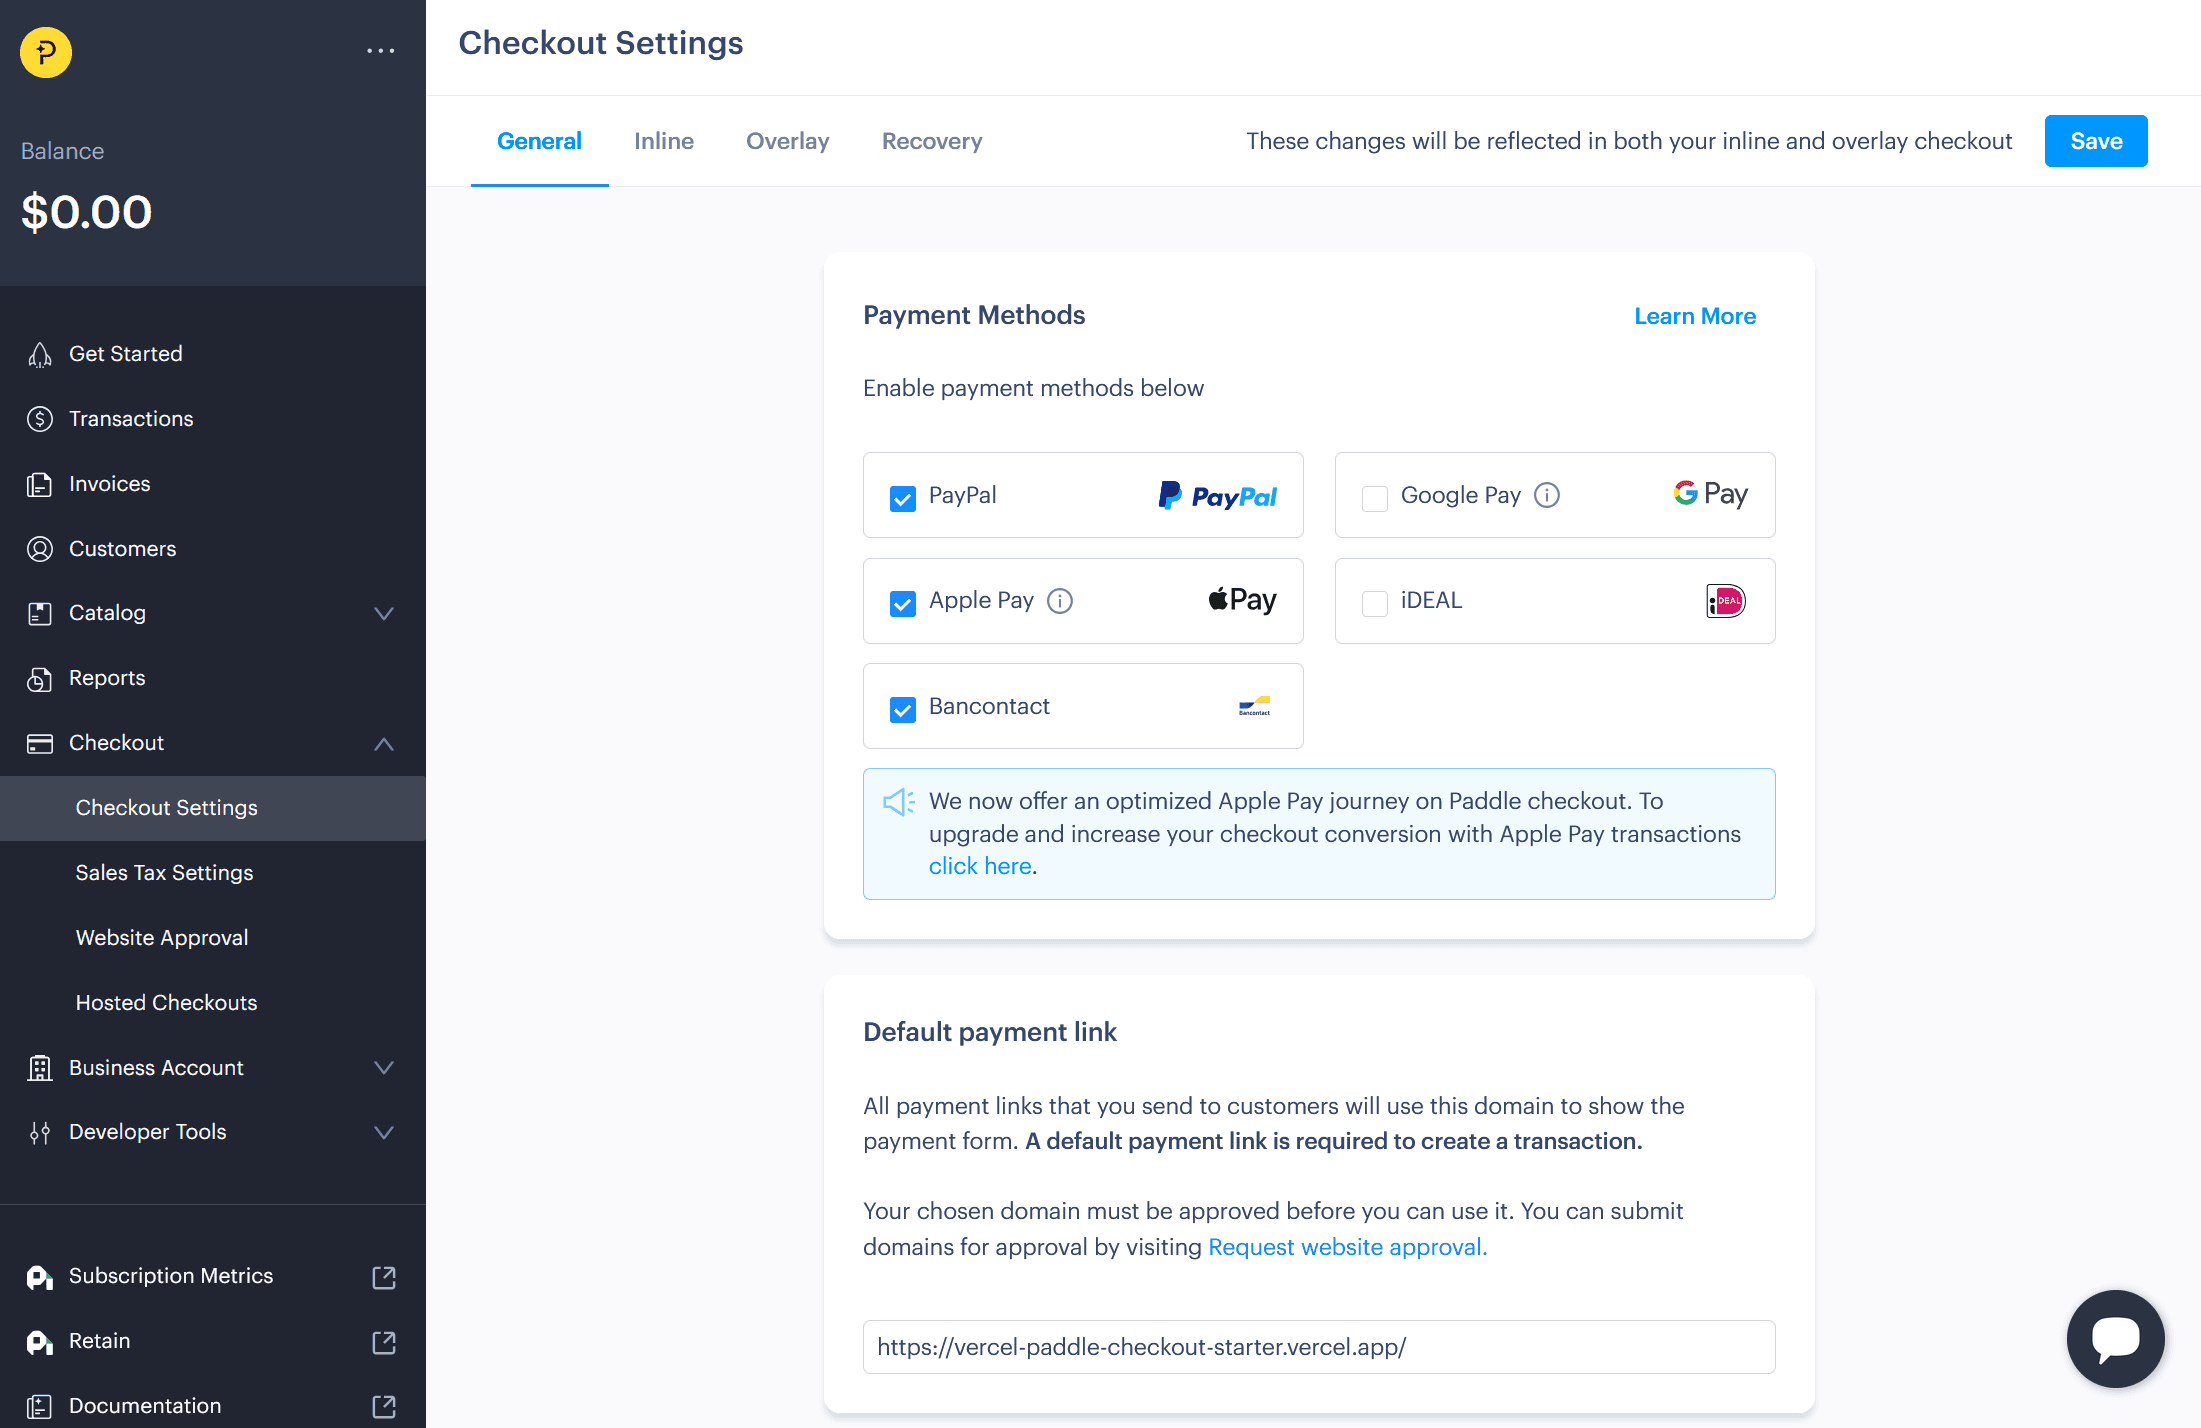
Once your domain is approved and the link is saved, you're ready to integrate with your iOS app.
With your checkout site live on Vercel, the next step is linking it to your iOS app.
There are two parts to doing this:
- Navigating to your Vercel hosted web checkout from inside your app
- Handling the return trip back to your app once the checkout is complete
In the example below, replace https://your-vercel-checkout-url.vercel.app with your actual Vercel deployment URL.
You can append query parameters like ?price_id=your-price-id&userId=123 to pass dynamic information to the checkout page.
To open the checkout page from your app, use the Linking API.
import { Button, Linking, Alert } from 'react-native';
const CHECKOUT_URL = "https://your-vercel-checkout-url.vercel.app?price_id=your-price-id&userId=123";
const openCheckout = async () => { try { const supported = await Linking.canOpenURL(CHECKOUT_URL); if (supported) { await Linking.openURL(CHECKOUT_URL); } else { Alert.alert("Error", `Cannot open URL: ${CHECKOUT_URL}`); } } catch (err) { Alert.alert("Error", "An unexpected error occurred"); console.error("Failed to open checkout", err); }};
// In your component:<Button title="Proceed to Checkout" onPress={openCheckout} />To handle the redirect back to your app, the template includes the required apple-app-site-association file, enabling redirects to paths like /checkout_redirect/success.
In your app.json or app.config.js configure the associatedDomains to link your app with your checkout URL.
// Replace with your actual domainconst CHECKOUT_DOMAIN = "your-vercel-checkout-url.vercel.app";
export default { ios: { // Must match NEXT_PUBLIC_BUNDLE_IDENTIFIER bundleIdentifier: "your.bundle.identifier", associatedDomains: [`applinks:${CHECKOUT_DOMAIN}`] } // ...};Then use expo-linking to detect, parse, and handle the incoming Universal Link when the user is redirected back to your app.
import * as Linking from 'expo-linking';import { useEffect } from 'react';
useEffect(() => { const handleUrl = (event) => { if (!event?.url) return;
const { path, queryParams } = Linking.parse(event.url); if (path?.includes('checkout_redirect/success') && queryParams?.txn) { console.log('Payment successful. Transaction ID:', queryParams.txn); // navigate('SuccessScreen', { transactionId: queryParams.txn }); } };
Linking.getInitialURL().then((url) => url && handleUrl({ url })); const subscription = Linking.addEventListener('url', handleUrl);
return () => subscription.remove();}, []);We recommend following the official Expo Linking docs for more detailed implementation information.
In a native Swift app, use SFSafariViewController to open the web checkout.
import UIKitimport SafariServices
func presentCheckoutInAppBrowser(from viewController: UIViewController) { let checkoutUrlString = "https://your-vercel-checkout-url.vercel.app?price_id=your-price-id&userId=123" guard let url = URL(string: checkoutUrlString), ["http", "https"].contains(url.scheme?.lowercased()) else { print("Invalid URL or scheme.") return }
let safariVC = SFSafariViewController(url: url) viewController.present(safariVC, animated: true, completion: nil)}To support redirects back into the app, add your domain to the Associated Domains entitlement in Xcode (applinks:your-vercel-checkout-url.vercel.app). Then, handle the Universal Link in your AppDelegate or SceneDelegate using NSUserActivity.
Refer to Apple’s Universal Links docs for additional information.
Once your app can open the checkout URL and receive Universal Link redirects, it’s important to verify the full flow end to end.
4.1 Start from your app
Launch your app in a simulator or on a real device. Trigger the logic that opens your deployed Vercel checkout URL. Make sure the browser or in-app browser opens correctly and that query parameters like price_id and userId are passed through as expected.
4.2 Complete a test transaction
In your deployed checkout page, use Paddle’s sandbox environment to run a test purchase. You can use the sandbox test card:
- Card number:
4242 4242 4242 4242 - Expiry: Any future date
- CVC:
100
If everything is configured correctly, the checkout will complete and redirect to the success route (e.g. /checkout_redirect/success?txn=...).
4.3 Verify the redirect
After a successful transaction, the browser will redirect to your Vercel domain. If you’ve correctly configured the apple-app-site-association file (which the Vercel template serves by default) and your app includes the associated domain (applinks:your-vercel-checkout-url.vercel.app), iOS will attempt to open the app using a Universal Link.
4.4 Handle the incoming link
Confirm that your app handles the redirect. The URL should include the expected path and query parameters, like a transaction ID. Use this data to show a confirmation screen, trigger entitlement updates, or log the result.
Troubleshooting
- If your app does not open automatically on redirect, double-check that your associated domains are set correctly in both your IDE and your app config (
app.jsonfor Expo) - If you're not receiving the expected parameters, log the full URL and inspect it manually
- In sandbox, you can repeat test transactions without needing real credentials or approval steps
A successful test confirms that your app can open the checkout, process a transaction through Paddle, and return to the app with the correct transaction data.
Once a user completes checkout and is redirected back to your app, you’ll need to unlock the features or content they purchased. There are two common ways to handle fulfillment:
- Use RevenueCat to manage entitlements automatically across platforms
- Use Paddle webhooks to implement your own fulfillment logic
If you're using RevenueCat, you don’t need to build anything custom.
When a purchase is completed, Paddle automatically shares transaction data with RevenueCat. Based on your entitlement configuration, RevenueCat grants access to the user. Your iOS app can then check entitlement status through the RevenueCat SDK.
This approach works well if you already use RevenueCat to manage subscriptions or entitlements across platforms.
If you’re managing your own backend, you can use Paddle webhooks to unlock access after a successful transaction.
When a checkout completes, Paddle sends a transaction.completed event to a webhook URL you configure. Your backend can listen for this event, validate it, and update user access based on the purchased items.
Here’s a simplified example of a webhook handler that listens for new transactions and provisions access:
// Example in a Vercel Serverless Function// app/api/paddle/webhook/route.ts
export async function POST(req: Request) { const rawBody = await req.text(); const payload = JSON.parse(rawBody);
const { data, event_type } = payload;
if (event_type === 'transaction.completed') { const transactionId = data.id; const purchasedItems = data.items || [];
// Look up the user in your database using data from the transaction const userId = getUserIdFromCustomerId(data.customer_id); // Your logic here
if (userId) { // Map purchased products to app permissions const permissionMap = { 'pro_XXXXXX': 'lifetimeAccess', 'pro_YYYYYY': 'temporaryAccess' };
const accessPermissions: Record<string, boolean> = {};
purchasedItems.forEach(({ price }) => { const permissionKey = permissionMap[price.product_id]; if (permissionKey) accessPermissions[permissionKey] = true; });
// Store or update permissions in your database await updateUserPermissions(userId, accessPermissions); } }
return new Response(JSON.stringify({ received: true }), { status: 200 });}To receive events from Paddle, go to Developer Tools → Notifications in your dashboard. Create a new destination, set the type to webhook, and enter the full URL of your deployed webhook handler.
For this example, you only need to subscribe to the transaction.completed event. You can add others later to handle cancellations, refunds, or renewals.
Once saved, Paddle will start sending events to your webhook when transactions complete.
After your backend processes the webhook and updates the user’s access, your app should reflect that state.
- If you're using RevenueCat, the SDK will automatically sync entitlements after purchase
- For custom setups, your app should query your backend for updated permissions, either immediately after returning from checkout or on the next app launch
Use that data to unlock features, update the UI, or show a confirmation screen.
To validate the flow, complete a purchase using the Paddle sandbox environment. Confirm your webhook receives the transaction.completed event and that your backend updates the correct user record.
If your backend isn't updating correctly, double-check your webhook handler logs, inspect the incoming payload, and verify that the customer or transaction IDs map correctly to your user model.
Then, return to the app and confirm that access is unlocked and functioning. If events aren’t coming through, check that your webhook URL is correct, the deployment is live, and that the right event types are enabled in Paddle.
Once everything is connected, users who complete checkout will immediately see their purchase reflected in-app.
You can start designing your decoupled checkout app, adding functionality, and making it your own. Vercel enables rapid iteration with zero-config deployments, automatic previews, and global infrastructure. Paired with Next.js, you get a React framework with built-in routing, API support, and an optimized developer experience out of the box.
- Clone the project from your Git provider to your local development environment
- Install dependencies using your preferred package manager (
npm,yarn, orpnpm) - Create a
.env.localfile in the root of your project and add the same environment variables you used during deployment, or use the `vc env pull` command - Run
npm run devto start the local server and preview your checkout athttp://localhost:3000
The starter template comes preconfigured with Tailwind CSS, so you can start customizing design immediately. Update colors, fonts, layout, and spacing using utility classes. Swap out the logo, adjust typography, and apply your brand styles for a consistent look and feel.
To tailor content, you can dynamically render product details based on the price_id passed into the URL. The app already accepts query parameters like ?price_id=pri_xxxx, which you can use to fetch or display relevant info such as name, description, or pricing. You can extend this to support multiple tiers or offers from a single deployment.
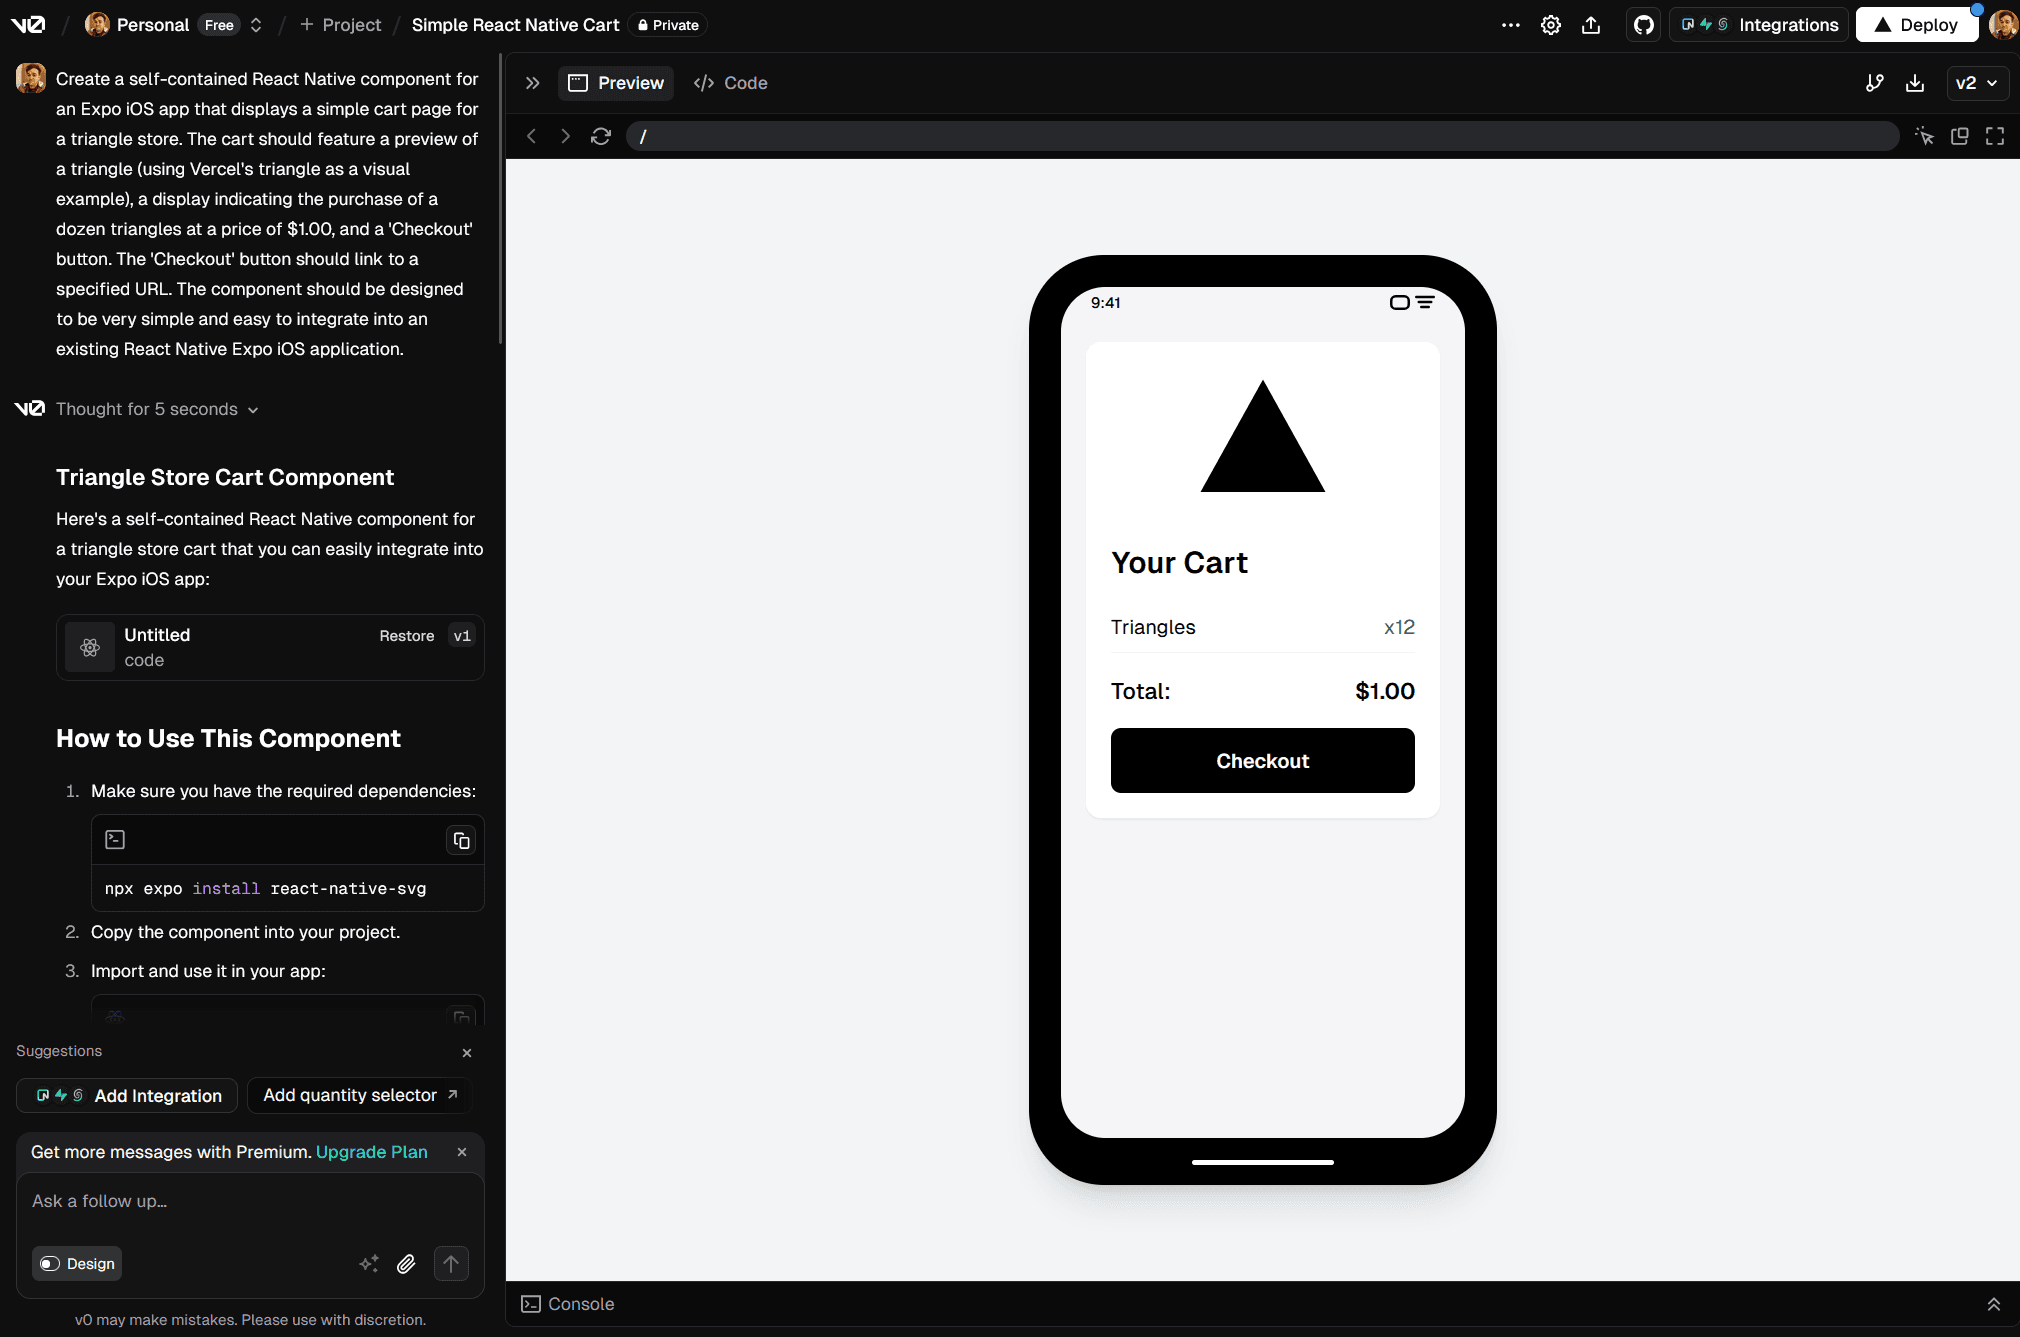
For a faster way to build polished UI, you can use v0 to generate ready-to-use React components. These components drop directly into your app with minimal code changes and can be styled using the existing Tailwind setup. This makes it easy to prototype and iterate without sacrificing structure or quality.
Once you're happy with your updates, commit your changes and push them to your Git repository. Vercel automatically detects the changes and redeploys your project using the latest code.
You can track the build in your Vercel dashboard. When the deployment finishes, visit your live site, confirm the changes, and run a test checkout to make sure everything works as expected.
This gives you a fast feedback loop for iterating on design, content, and functionality all backed by Vercel’s global infrastructure.
Paddle and Vercel cover many of the operational and technical requirements needed to run a secure, compliant, and high-performance checkout experience.
Paddle acts as the Merchant of Record and handles global payments on your behalf. This includes VAT and GST collection, PCI-DSS compliance, fraud protection, and chargebacks. You don’t need to build your own tax engine or maintain secure payment infrastructure.
That said, you're still responsible for how you collect and store user data in your app. If you process personal information, ensure your systems comply with privacy regulations like GDPR. Paddle provides data portability tools and DPA agreements to help support compliance on your side.
Vercel includes built-in analytics you can enable to track frontend performance, page views, and user behavior across your checkout app. This helps you optimize load times and identify conversion drop-off points by device, region, or interaction pattern.
Paddle also provides a full dashboard for monitoring sales, subscriptions, churn, MRR, and more. Together, these tools give you visibility into both product performance and revenue trends, so you can refine your user experience and monetization strategy as you grow.
This guide focused on deploying the Paddle In-App Checkout Starter on Vercel. A fast, flexible template built with Next.js and designed to give you control over your checkout experience from day one.
For teams that need even more flexibility or want to extend their integration further, Paddle also offers additional tools for building advanced checkout flows.
If you're building a fully custom checkout, you can use paddle.js to embed the purchase flow directly into your frontend. Combine it with Paddle’s backend SDKs for Node.js, Python, Go, and more to manage customer data, subscriptions, and transactions however you need.
This setup pairs well with Vercel if you're using Next.js with API routes or running your own backend services. It’s a strong fit for teams with advanced product requirements or infrastructure already in place.
For the fastest path to launch, Hosted Checkout is a simpler alternative. You define your products and pricing in the Paddle dashboard, generate a hosted checkout link, and drop it into your app, no custom frontend or deployment needed.
You can start here and always migrate to a more flexible setup later as your needs grow.
You’ve now deployed a fully functional external checkout, hosted on Vercel and integrated with Paddle. Your app can route users from iOS to a web-based checkout, return them via Universal Link, and unlock access after purchase without relying on in-app purchases or paying platform fees.
Along the way, you connected Universal Links, tested the full flow, and set up fulfillment through either RevenueCat or your own webhook system. Your checkout is live, performant, and built for iteration.
If you're ready to go further:
- Deploy your own instance using the Paddle in-app checkout starter template
- Join the upcoming webinar (add details + link)
- Read our blog post to learn more about the ruling and what it enables
This is more than a new integration path. You're reclaiming margin that was previously lost to App Store fees, and unlocking the ability to build fast, secure, and customizable checkout flows on your terms.
With your payment experience now powered by Next.js and deployed globally on Vercel, you can control pricing, own the customer relationship, and ship changes with the same speed as the rest of your product.